AD Disclaimer: This blog post is part of a paid partnership with Tile Giant
One of the things I love most in this slow old renovation of ours is having the courage to learn new skills and try out new ideas. Some people take to DIY like a duck to water, but I’m not that person. I love a bit of procrastination and it can take me a while to have a go. When Tile Giant got in touch to see if I’d like to work with them on a tiling project of my choice at home, I decided to see if I could further hone my tiling skills after the success of my outdoor coffee table. I think this latest project has worked out pretty well so here are my top tips for tiling a bath panel.
Top Tips For Tiling A Bath Panel – The Tiles
For this project, I was able to choose from the huge range of tiles at Tile Giant. From floor tiles to wall tiles, even natural stone tiles and all the accessories you could need to help with your project, Tile Giant offer a superb online service and also have over 80 stores to see the tiles in person. Whilst we’ve got many larger projects down the line such as redoing our en-suite and tiling our hallway floor, I wanted to tackle a smaller project which may inspire my readers to have a go themselves.
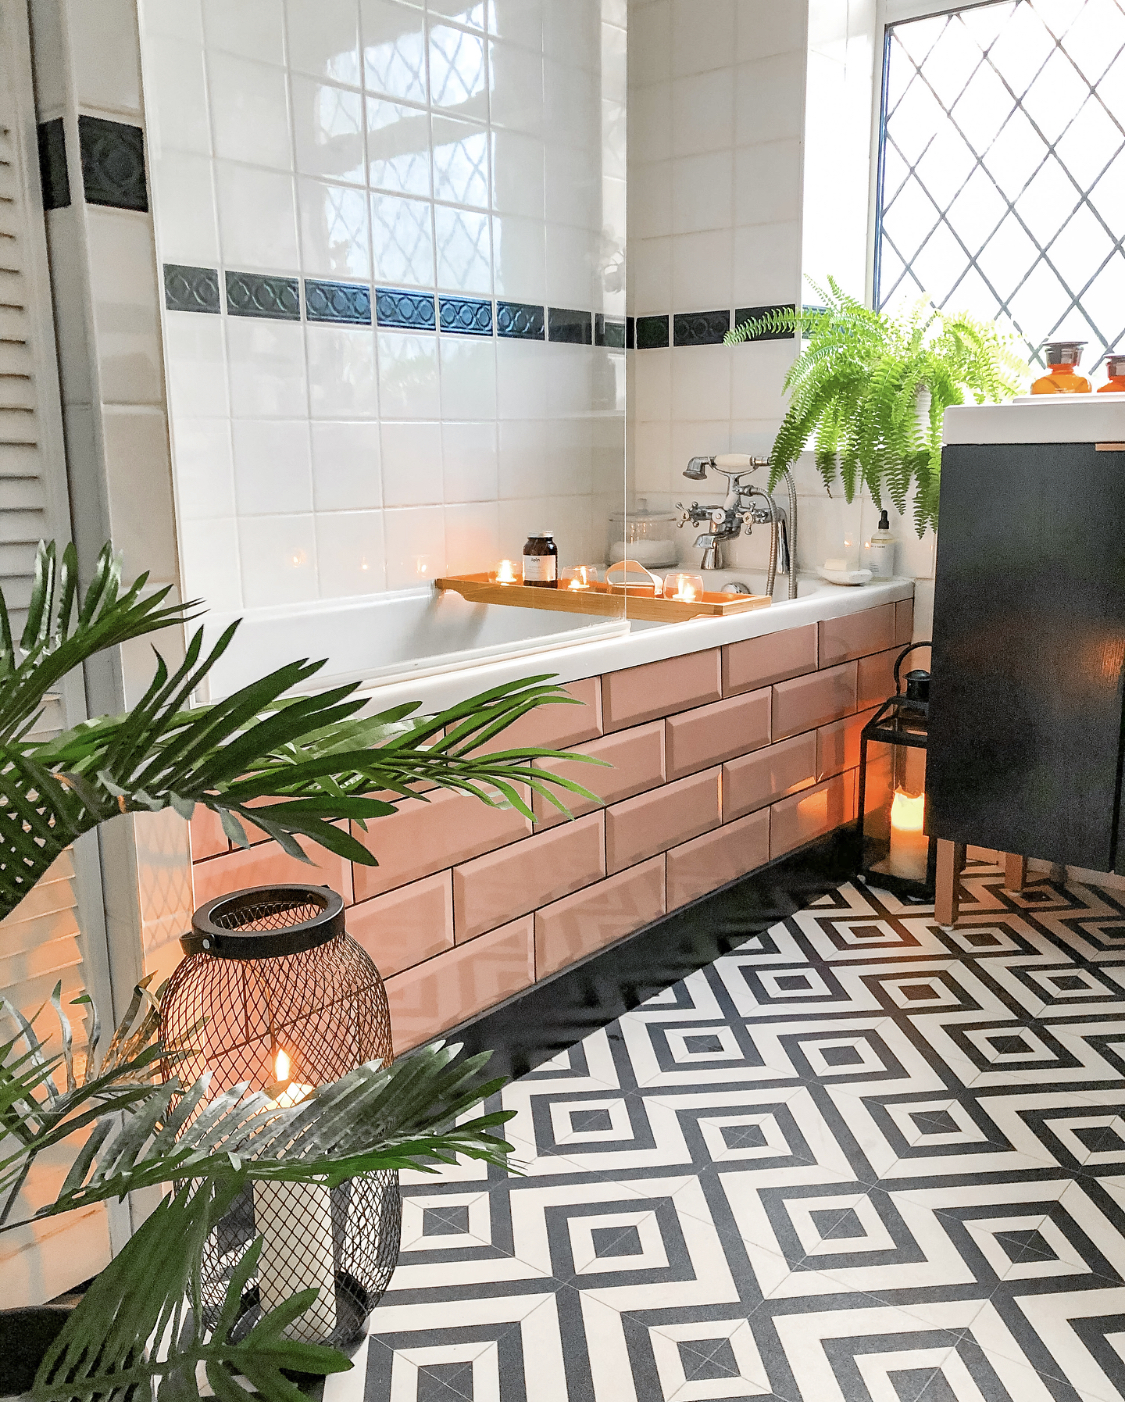
I decided to tile the bath panel in our main bathroom, adding a bit of pink to our predominantly monochrome colour scheme. I should add right here a very important caveat – this does block access to underneath our bath, if we should ever need it. I’m keeping everything crossed that since in nearly 7 years here, we’ve never had any issues and had all the plumbing checked over last summer, it’s safe to assume we won’t have any problems and need to gain access to the plumbing *crosses fingers tightly*. If you need to create a frame in the first place, bath panel clips may also be helpful for you.
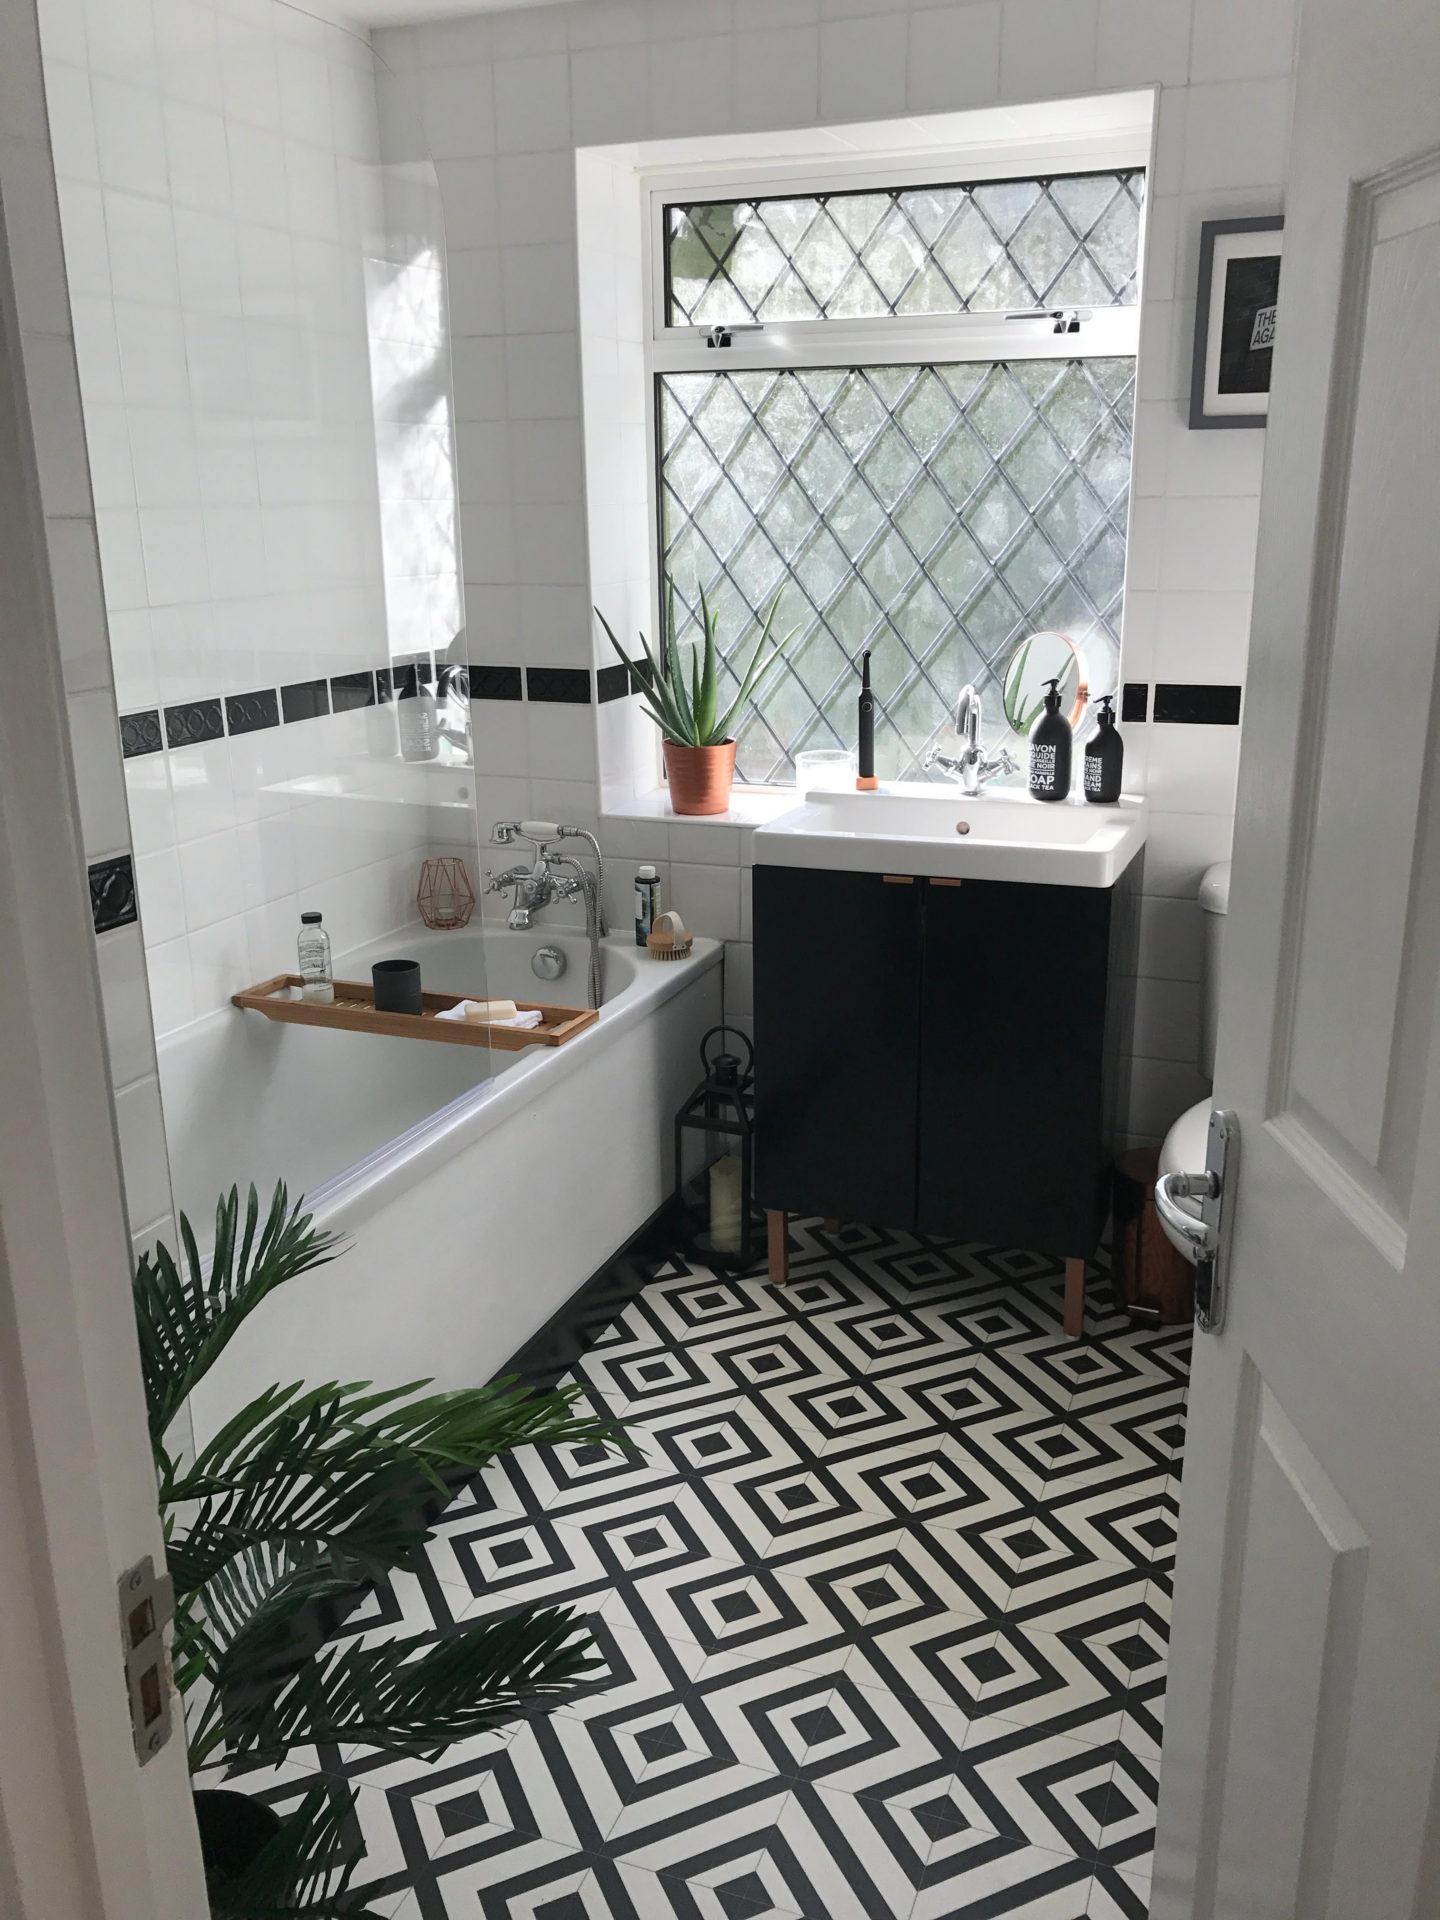
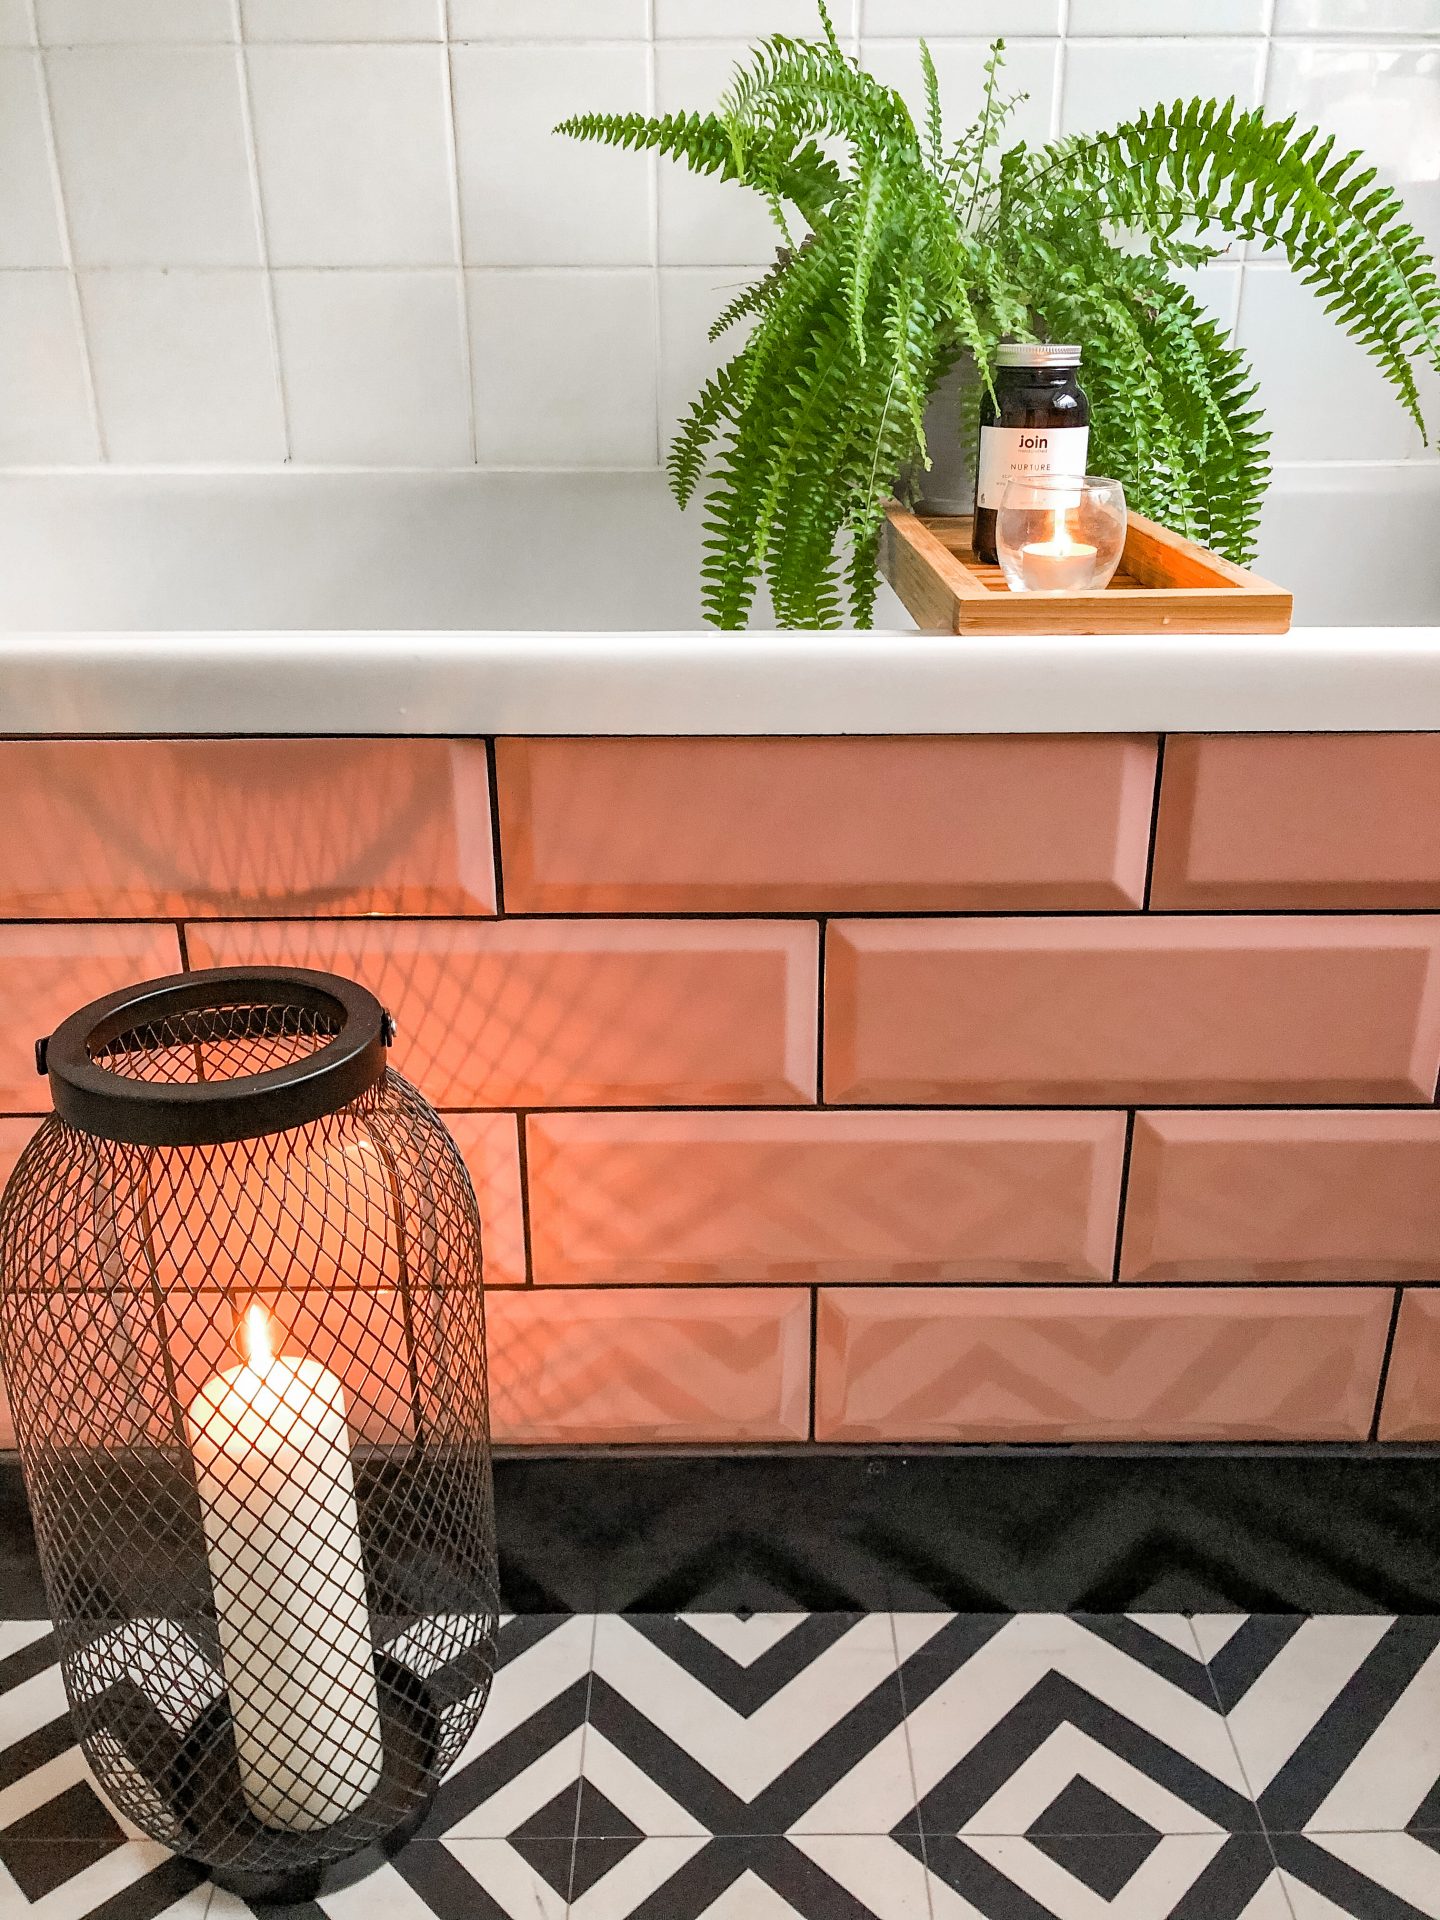
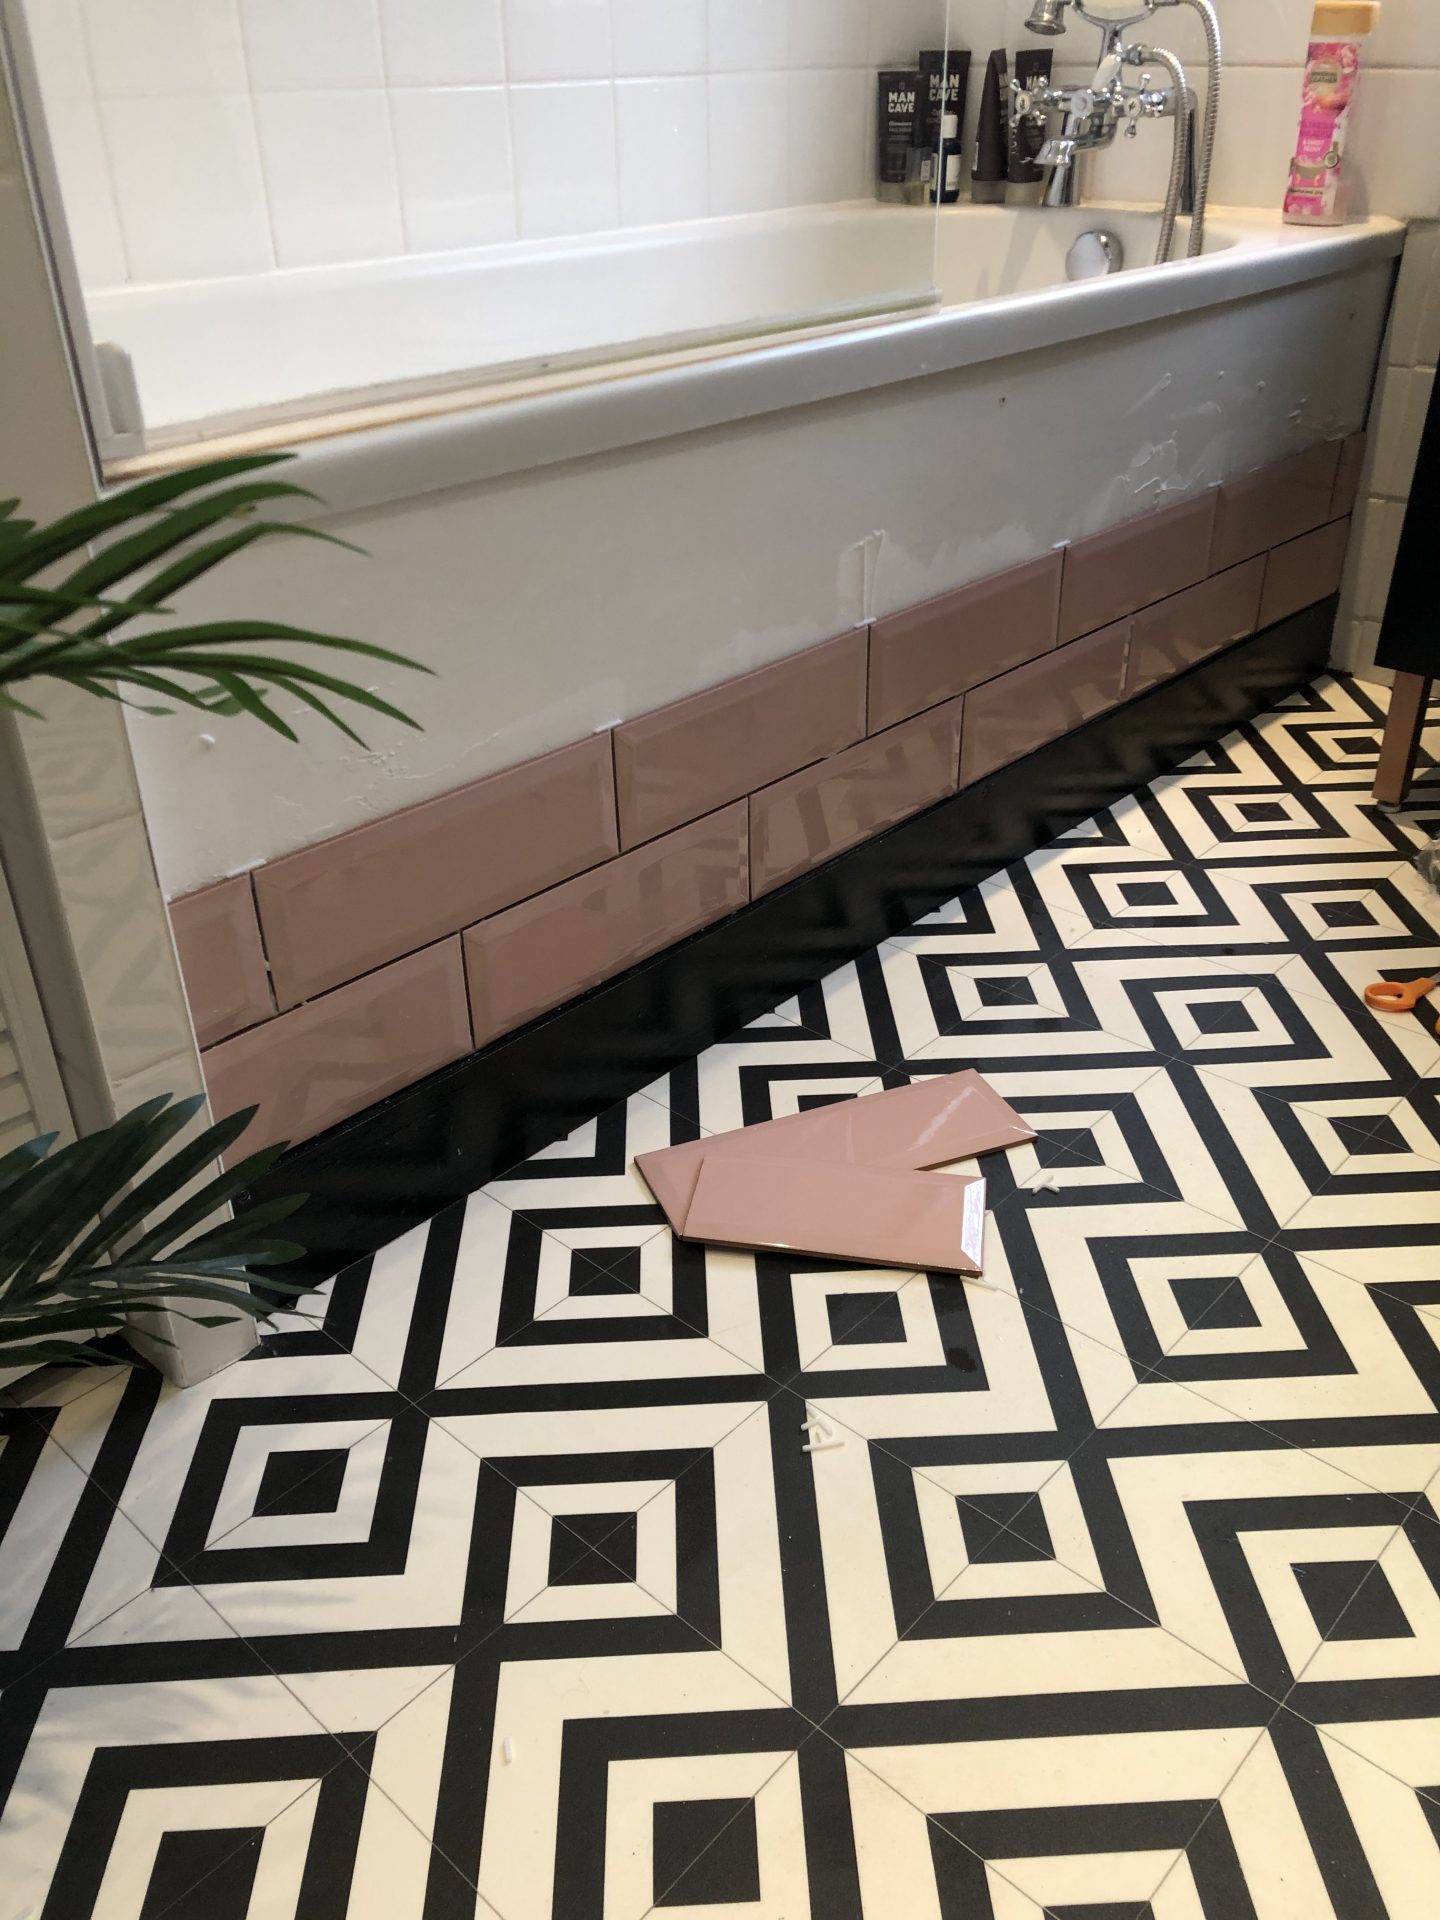
The bathroom has had a bit of a budget makeover a few years ago just to make it good until we can afford bigger renovations, and as part of that we replaced the rotten original bath panel with some MDF costing just £15 that I then painted. Its been totally perfect ever since but a little plain and I decided that the Metro Blush Pink tiles in 100 x 300 would be perfect for my project.
It’s really easy to work out how many tiles you’ll need using the online calculator, and although it was more than my area space they sent me two boxes of tiles in case I made any mistakes cutting them (and I did, needless to say!) They also sent me a dry tile cutter to help with the project.
Top Tips For Tiling A Bath Panel – Getting Started
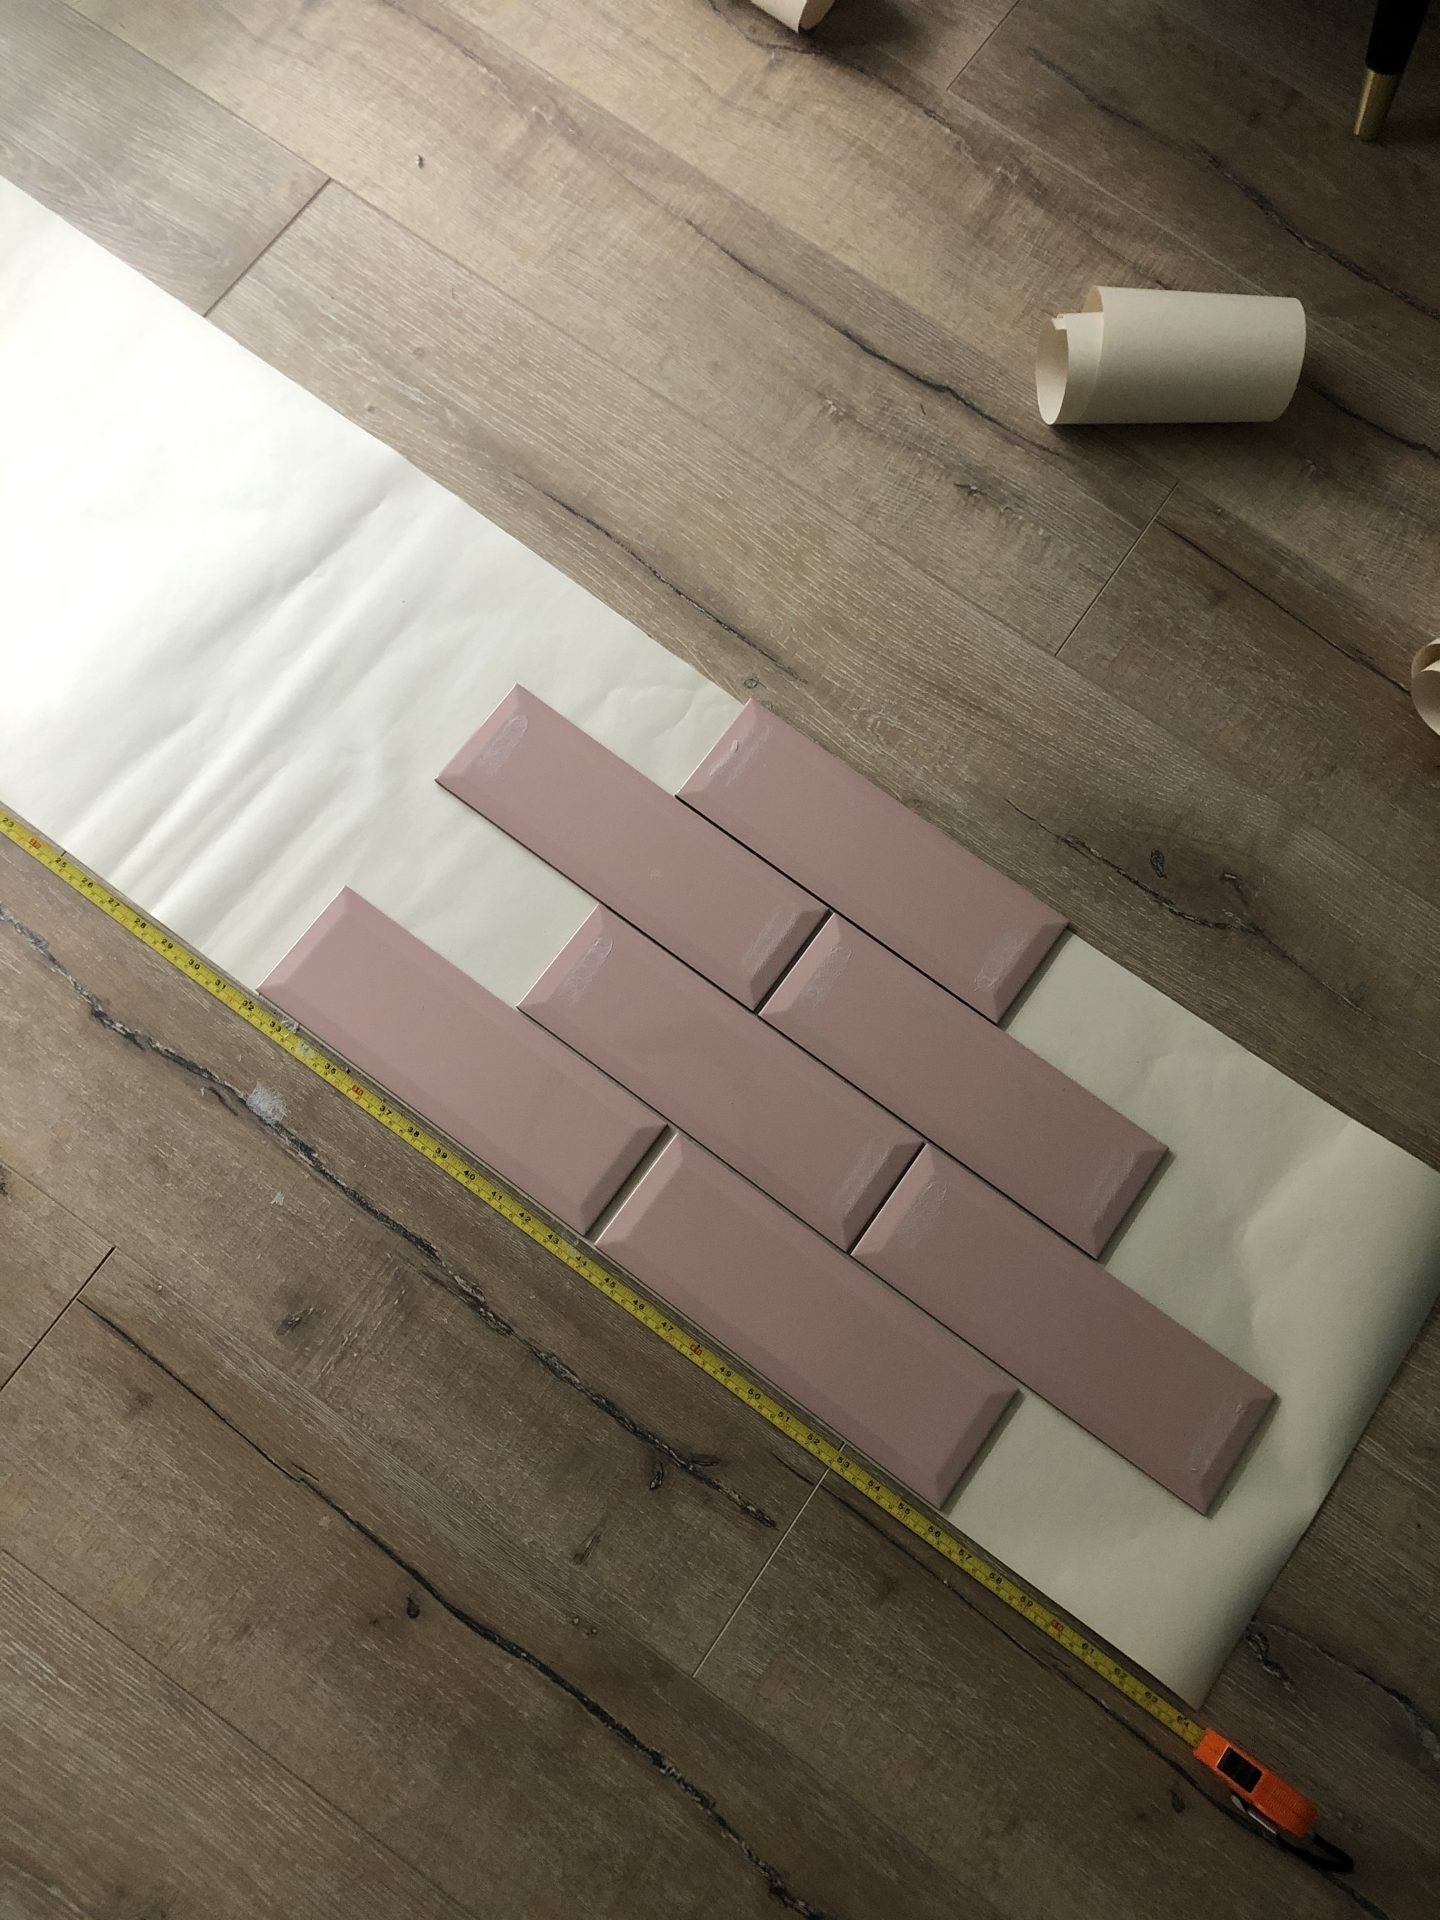
Our bathroom isn’t that big and part of the bath panel is slightly covered by the sink vanity unit so I decided to make a template of the panel using lining paper to practice my tile pattern.
I found a great brand after receiving the ones I ordered and so it’s worth checking out Royal Bathrooms for your bath panels as well since they offer quite a range to choose from. They are high-quality and pocket-friendly.
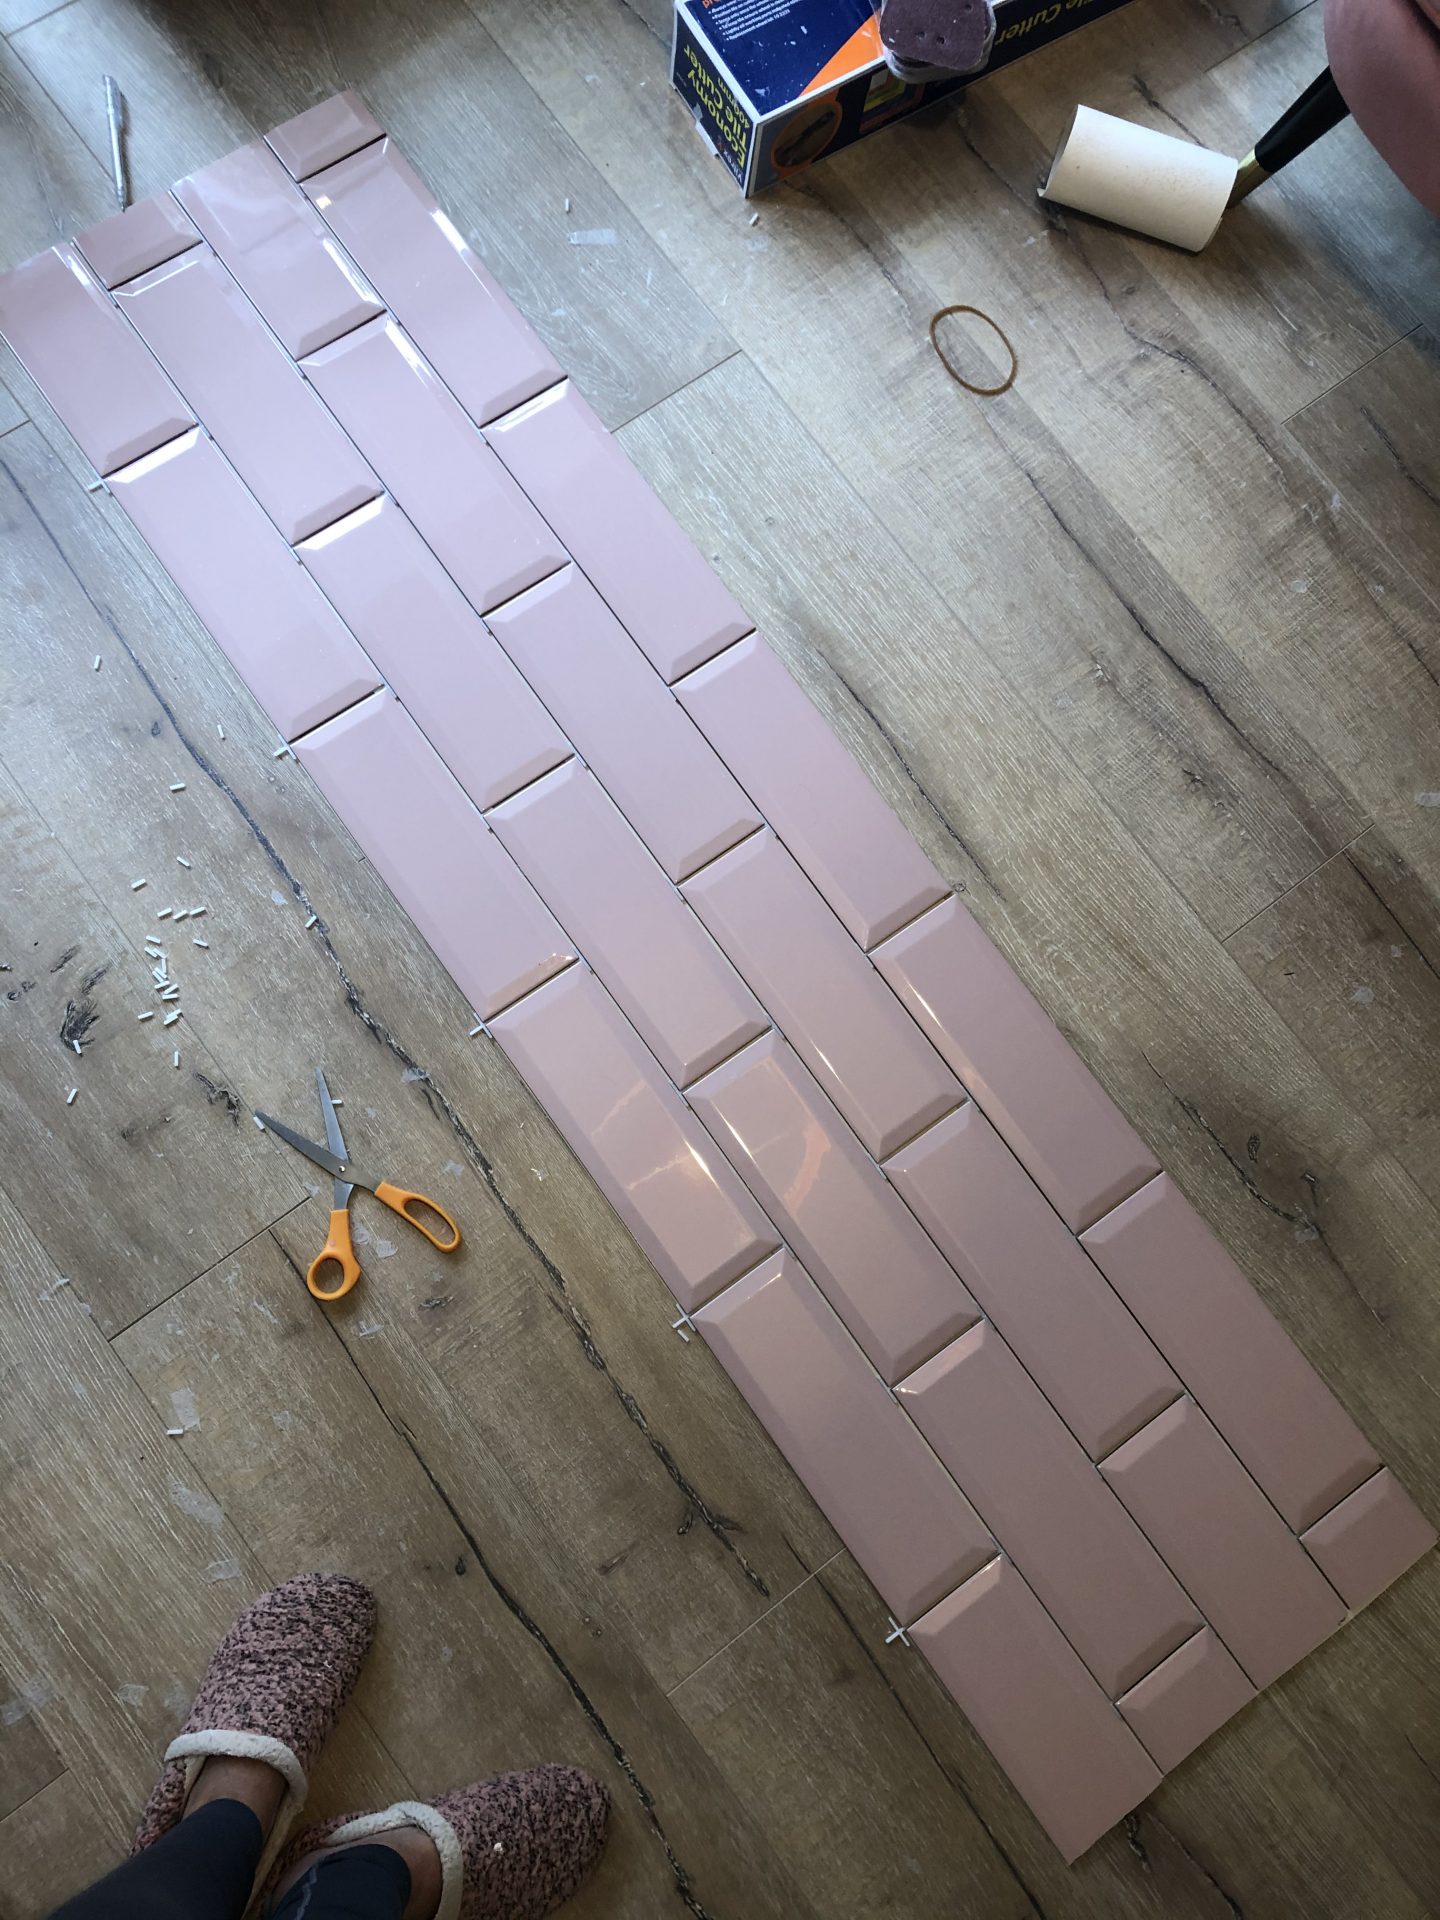
There are soooo many different layouts for metro tiles that I wanted to have a play around and settle on a pattern plus make all my cuts before I started tiling.
I decided on a brick pattern in a half style. The lovely Lydia over at House of Spolland did some tiling in her kitchen and saved a really helpful Q&A to her IGTV so if you’re in need of some visual tips that’s a great place to look. It’s a good idea to measure the centre point at the bottom of your tiling area, and then layout your tiles from left to right after that centre point, and then go back the other way. What this does is make sure that your pattern is completely symmetrical as you look at it. If you start tiling from one end to the other, you’ll have an uneven tile distribution.
Once you have your bottom row laid out, you can then place the row above it, to see how the tiles will lay. Inevitably in this formation, you’ll need to cut some tiles. Larger tiles look better than smaller ones, so if when you get to the end of a row you’ve only got space for a small sliver of tile, reconfigure your layout until you’re happy with it.
Top Tips For Tiling A Bath Panel – Cutting Tiles
This was probably the part of the project I was most nervous about as I’ve never cut tiles before and am notoriously clumsy. As part of the project Tile Giant sent me the Vitrex Economy Tile Cutter which is excellent for small tile cuts. I was able to make all the cuts for the ends of my rows with the tile cutter, a couple of practice attempts and away I went. If you do have any rough edges these can be sanded down.
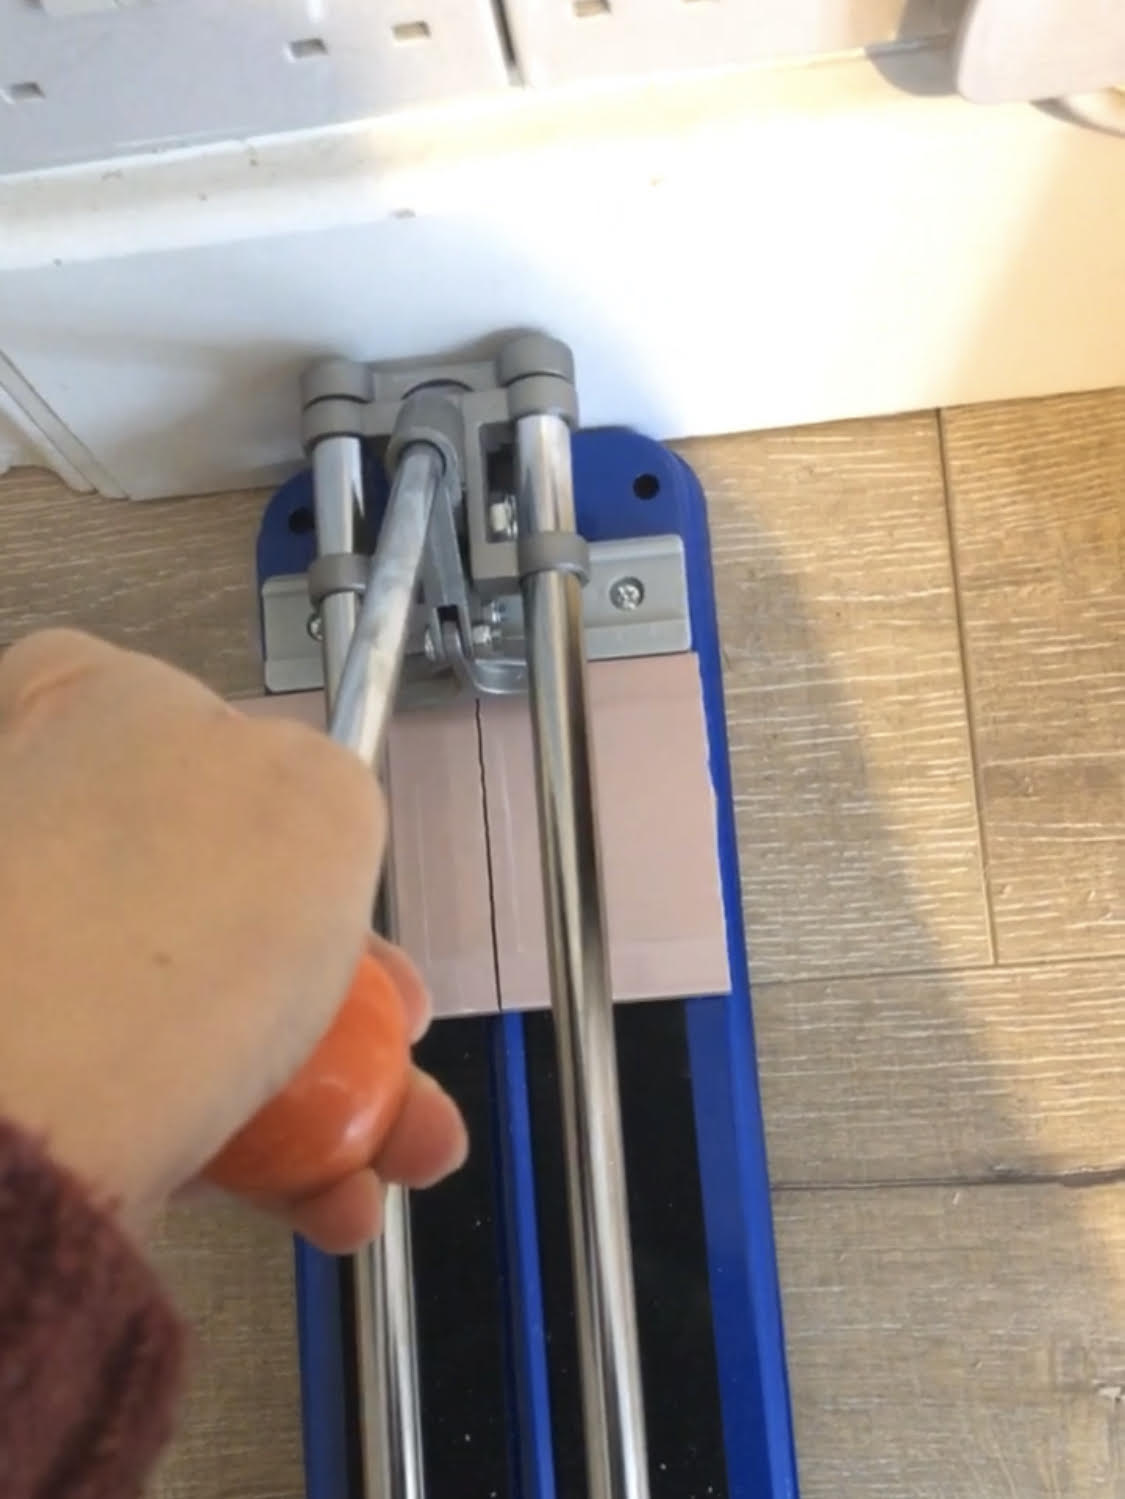
We did however have to go out and purchase a wet tile cutter that we bought from our local Screwfix. I had 4 rows of tiles to cover the bath panel, and my top row was just a touch too big to fit. Since they’re 300mm long, it wasn’t possible to cut them using the small tile cutter and since this probably won’t be the last time I tile we decided it was a sensible investment.
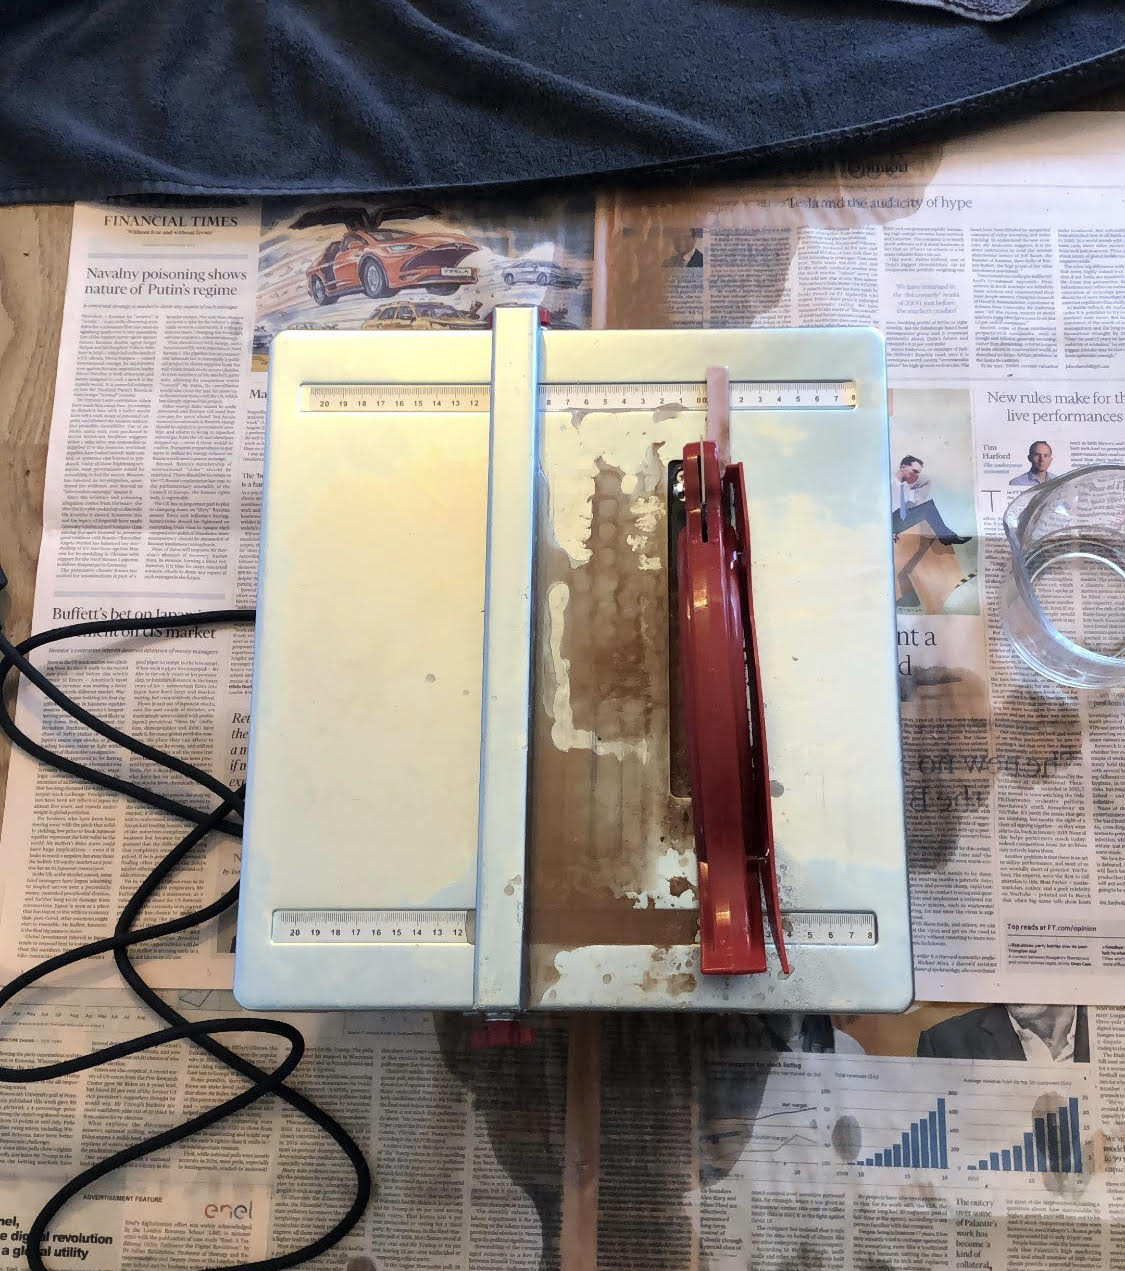
Let me tell you I will never really understand tools that you need a phD to assemble, before you can get on with the job in hand! It took me longer to put the wet tile cutter together than it did to cut my 5 tiles but it was so worth it. It’s a messy job and basically just pushes water out of the back so if you’re able to it’s definitely an outdoor job. But I only needed one tile to practice on and it made perfect cuts every time so I’m really happy we decided to go for it.
Top Tips For Tiling A Bath Panel – Tiling
Once I had the pattern sorted and cuts made it was time to get tiling. Honestly, doing the prep work in advance is really recommended and if you get it right, tiling should be very straightforward. Again, I made my midway point on the bath panel, and did the bottom row exactly the same way as I did it on my template, using 3mm tile spacers to make sure the tiles are evenly spaced.
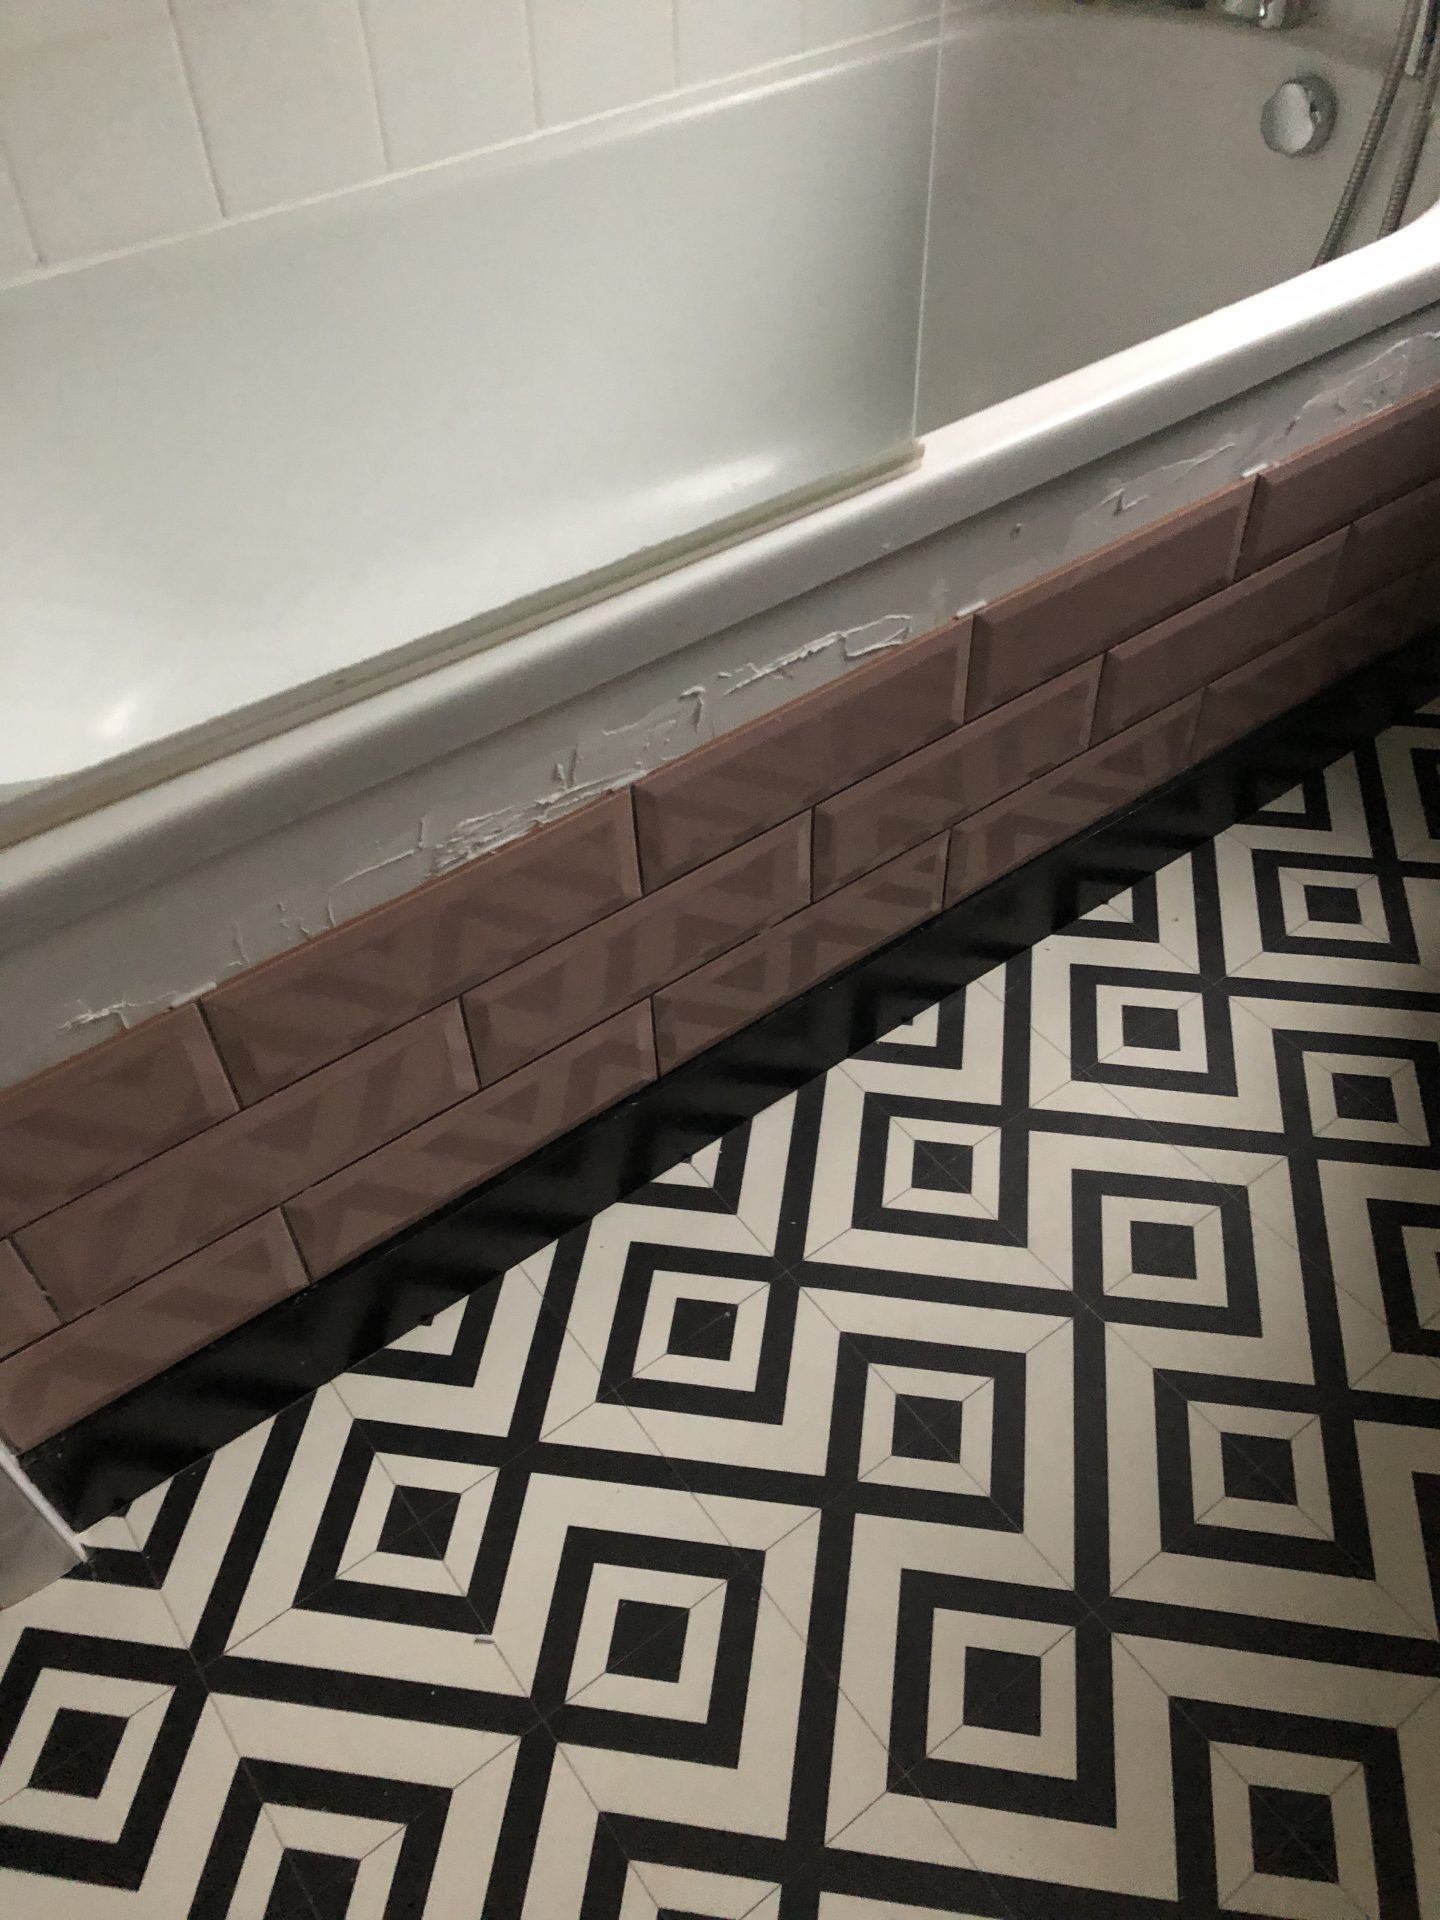
For the adhesive, I bought a ready mixed Mapei adhesive and grout in one, thinking I’d use it for grouting too. More on that later! The tiles were so easy to work with, light and easy to manoeuvre. Once I did the bottom row, I actually then did the remaining rows all the way from left to right. The reason is that the right end of the bath panel as I mentioned is obscured by the sink vanity, so it made sense to make sure my left edge which is the one that’s seen was absolutely aligned and then I had a bit of leeway if needed at the right end to allow for any little errors – in the end it wasn’t needed as the measurements worked out so well.
Top Tips For Tiling A Bath Panel – Grouting

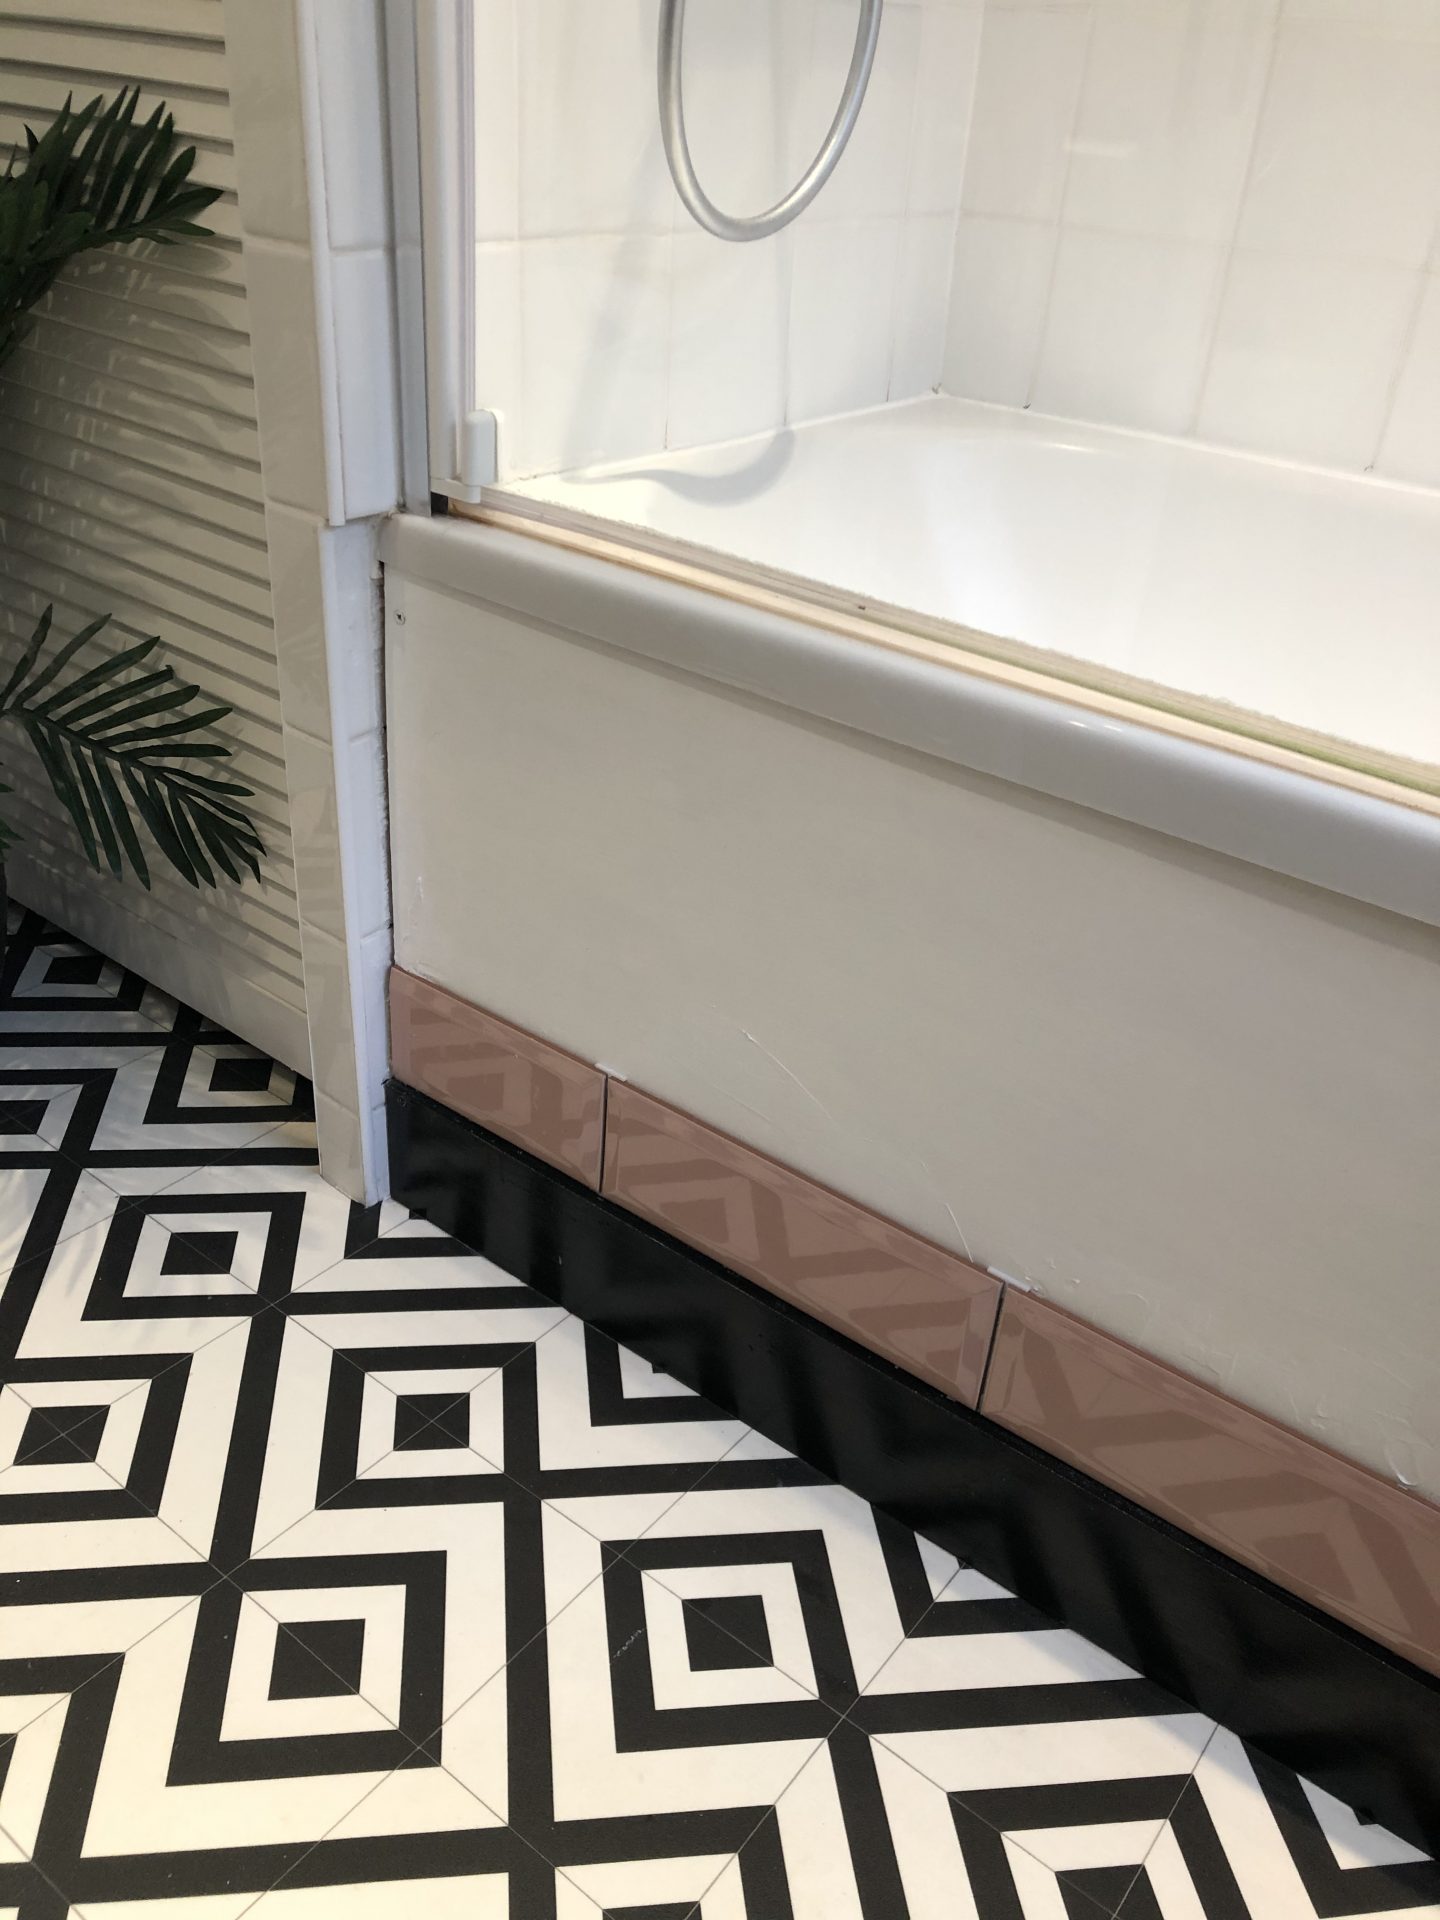
So here’s an interesting thing. Having recently had our fireplace tiled with pink and white tiles, and obviously the pink and white outdoor table, I was just convinced ahead of time that I’d want white grout. In fact Tile Giant even recommend a white grout for these tiles. And yet when I started grouting, it just felt like the white grout left them a little bit flat – I think this is probably down to me only using 3mm tile spacers as I’ve seen plenty of amazing bathrooms on Instagram where pink tiles and white grout are combined.
I chewed it over with Pete and decided that black grout would really make the tiles properly pop – especially against our white and black vinyl floor and the black kickboard. So I went for it, but the grout came in powder form for mixing with water. This stuff is not my friend – I find it hard it hard to come up with the right amount and you really have to work FAST. When it says it will be rock solid in 30 minutes, it will be. I don’t have any photos to share of the process because it stresses me out slightly 😊 but as soon as I started cleaning the grout off the tiles I knew 100% it was the right decision and I’m beyond happy that I took a leap of faith on the darker colour.
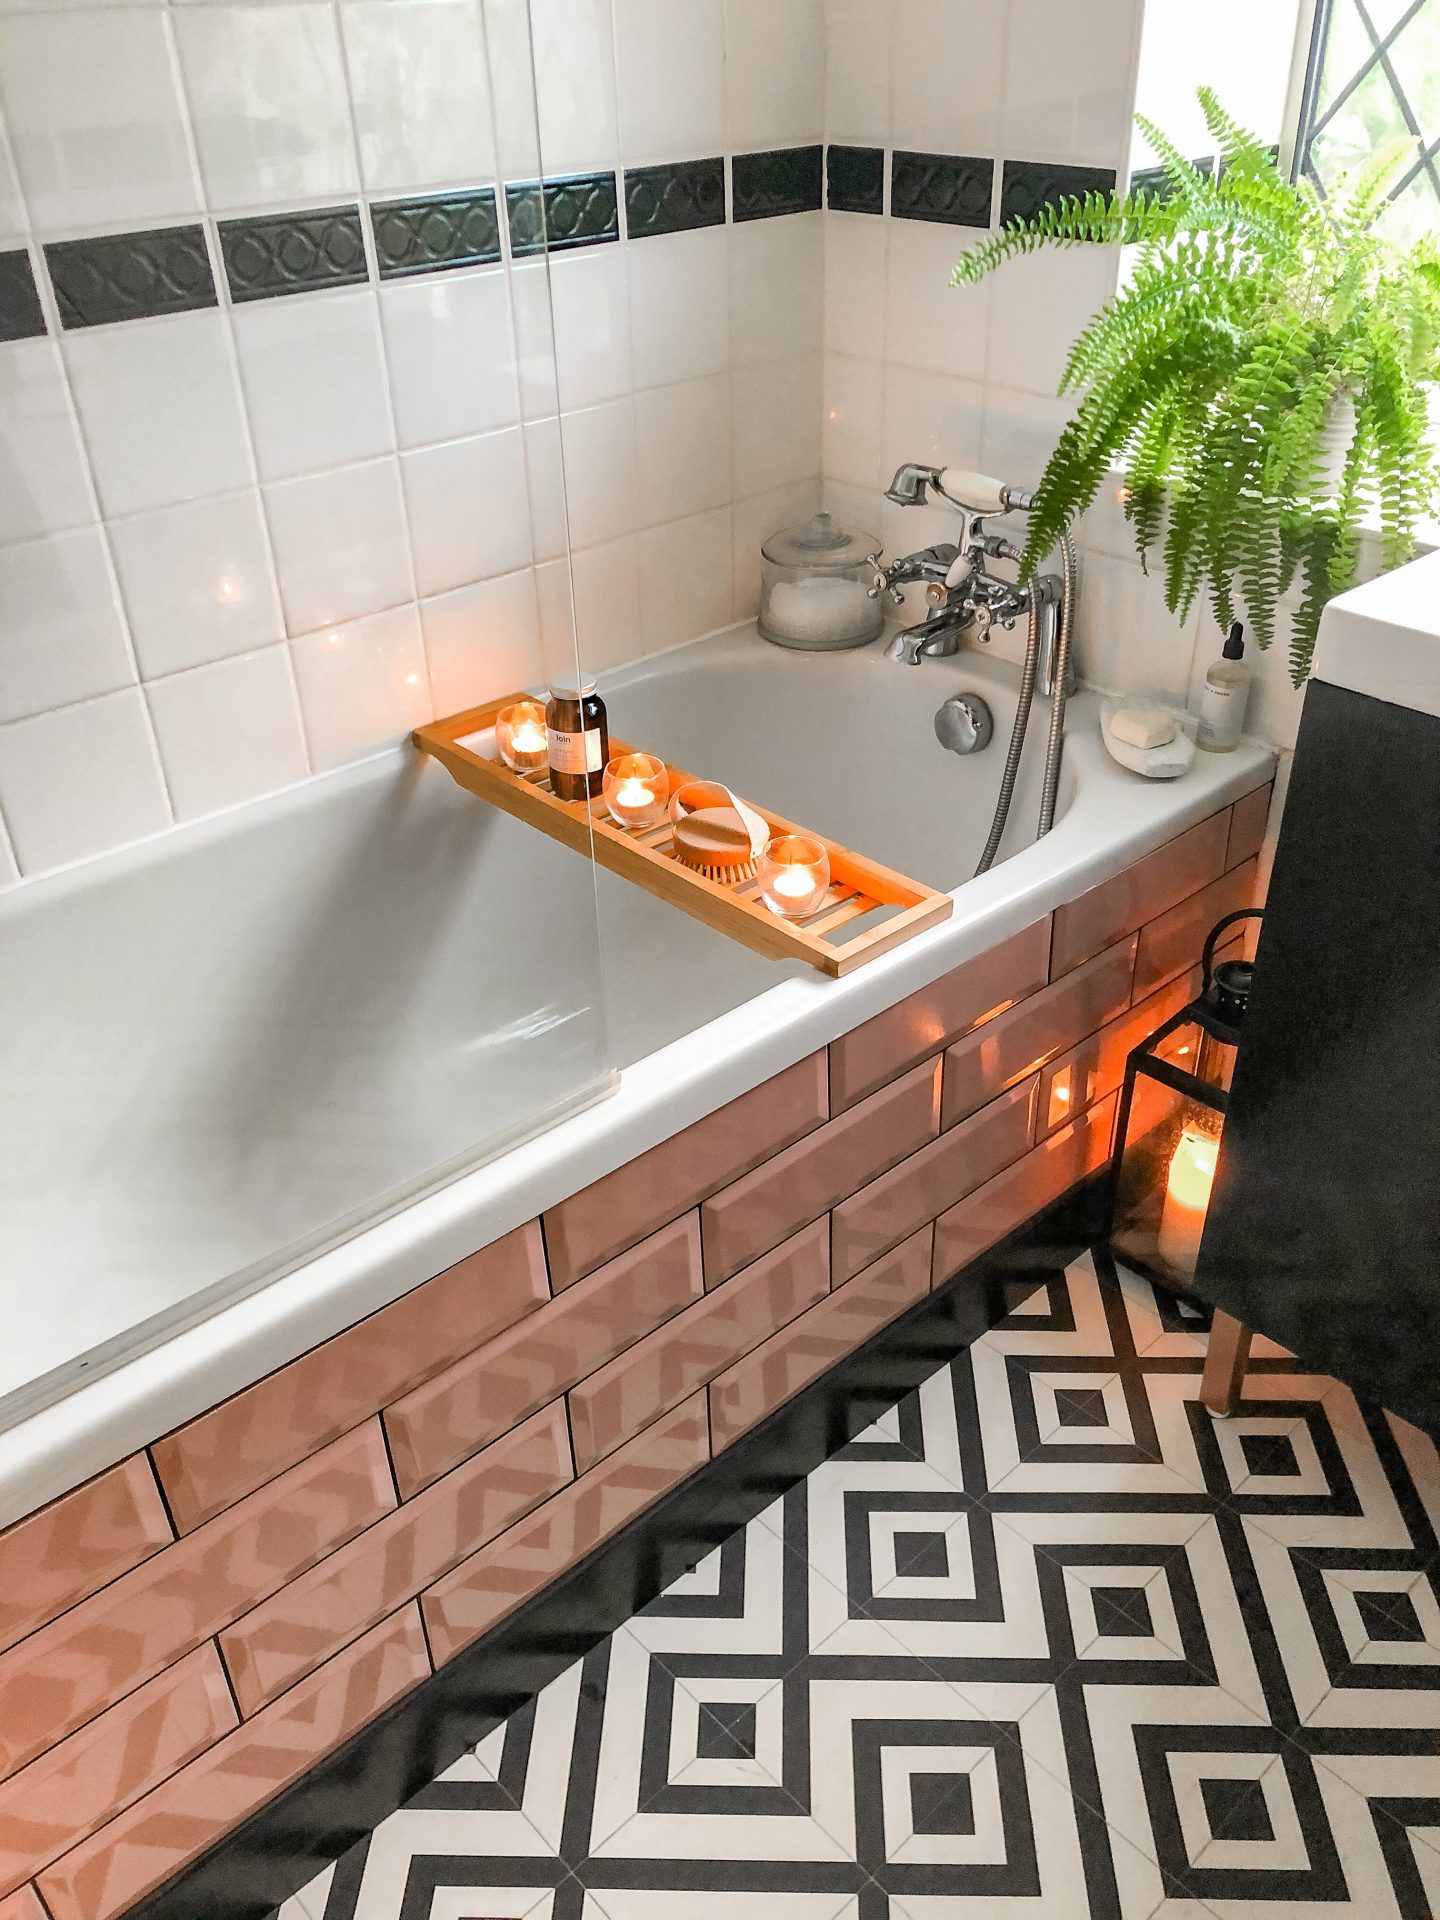
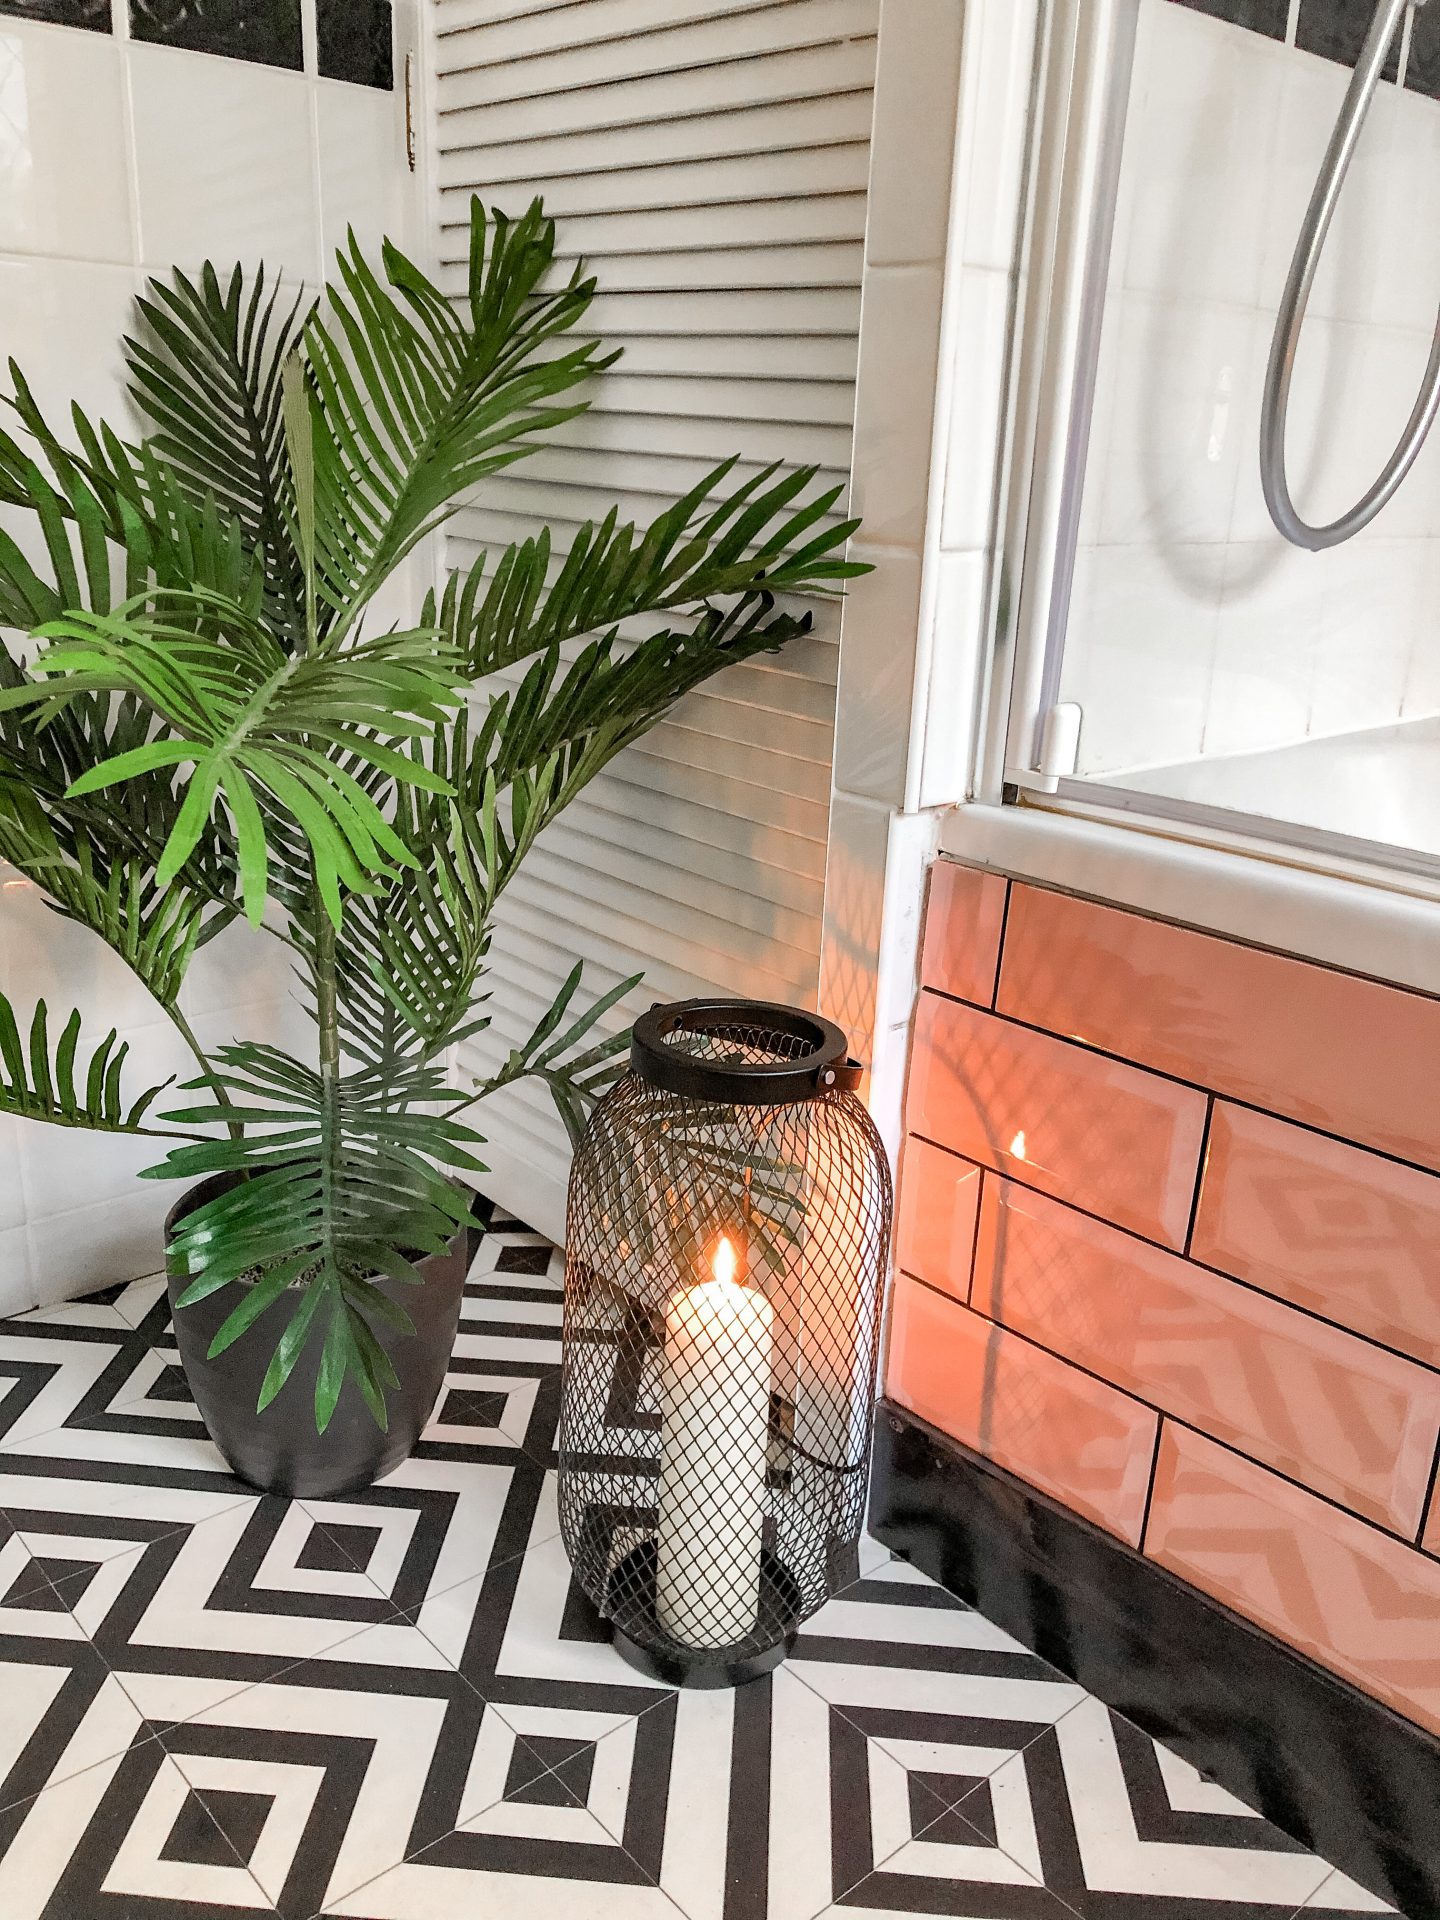
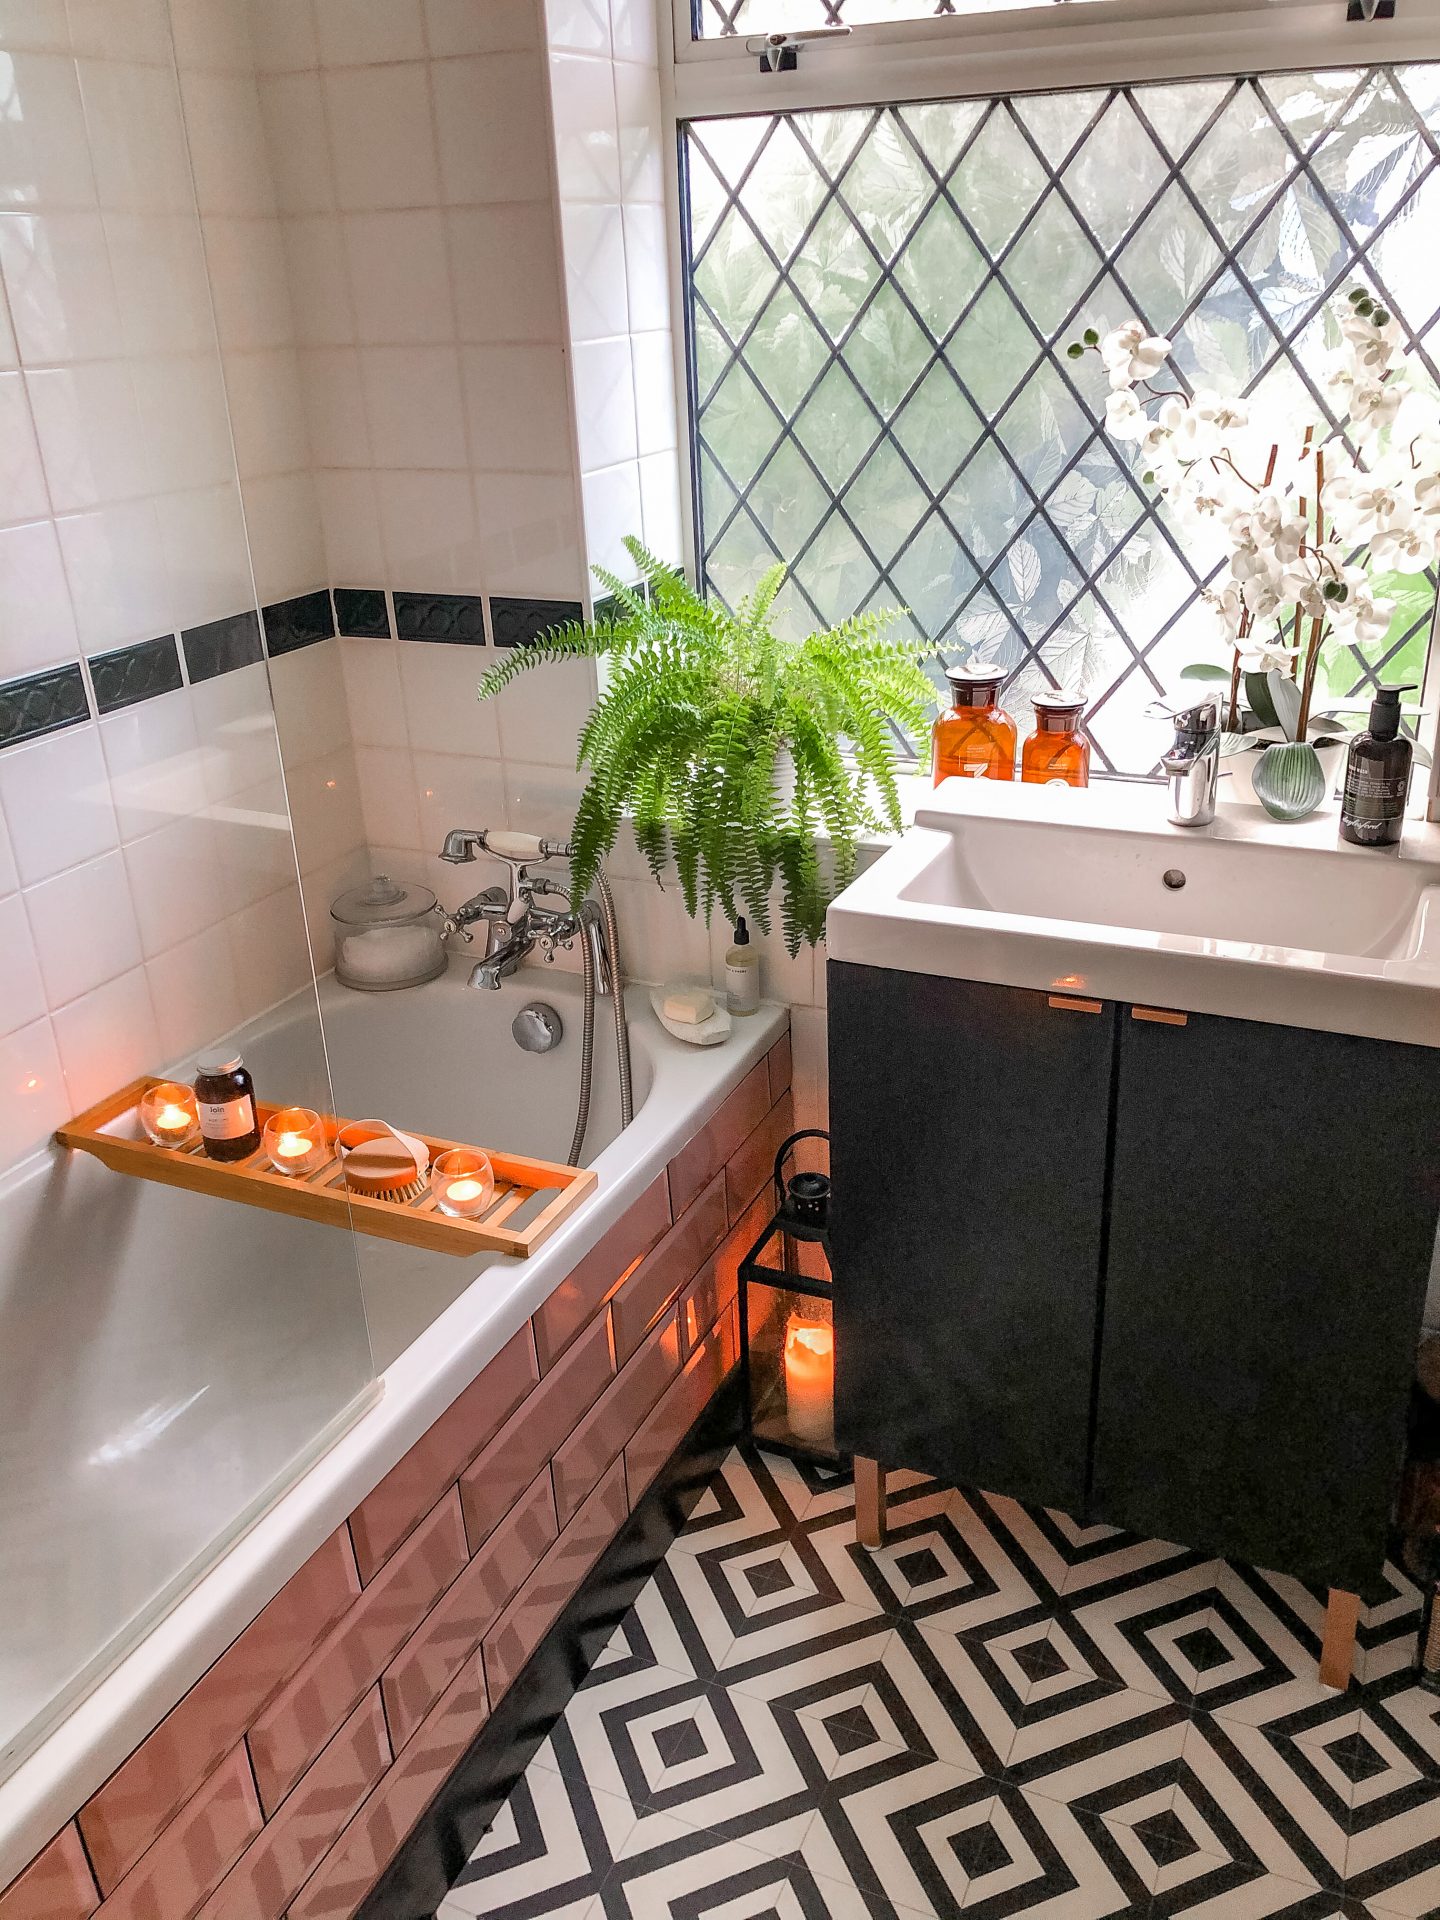
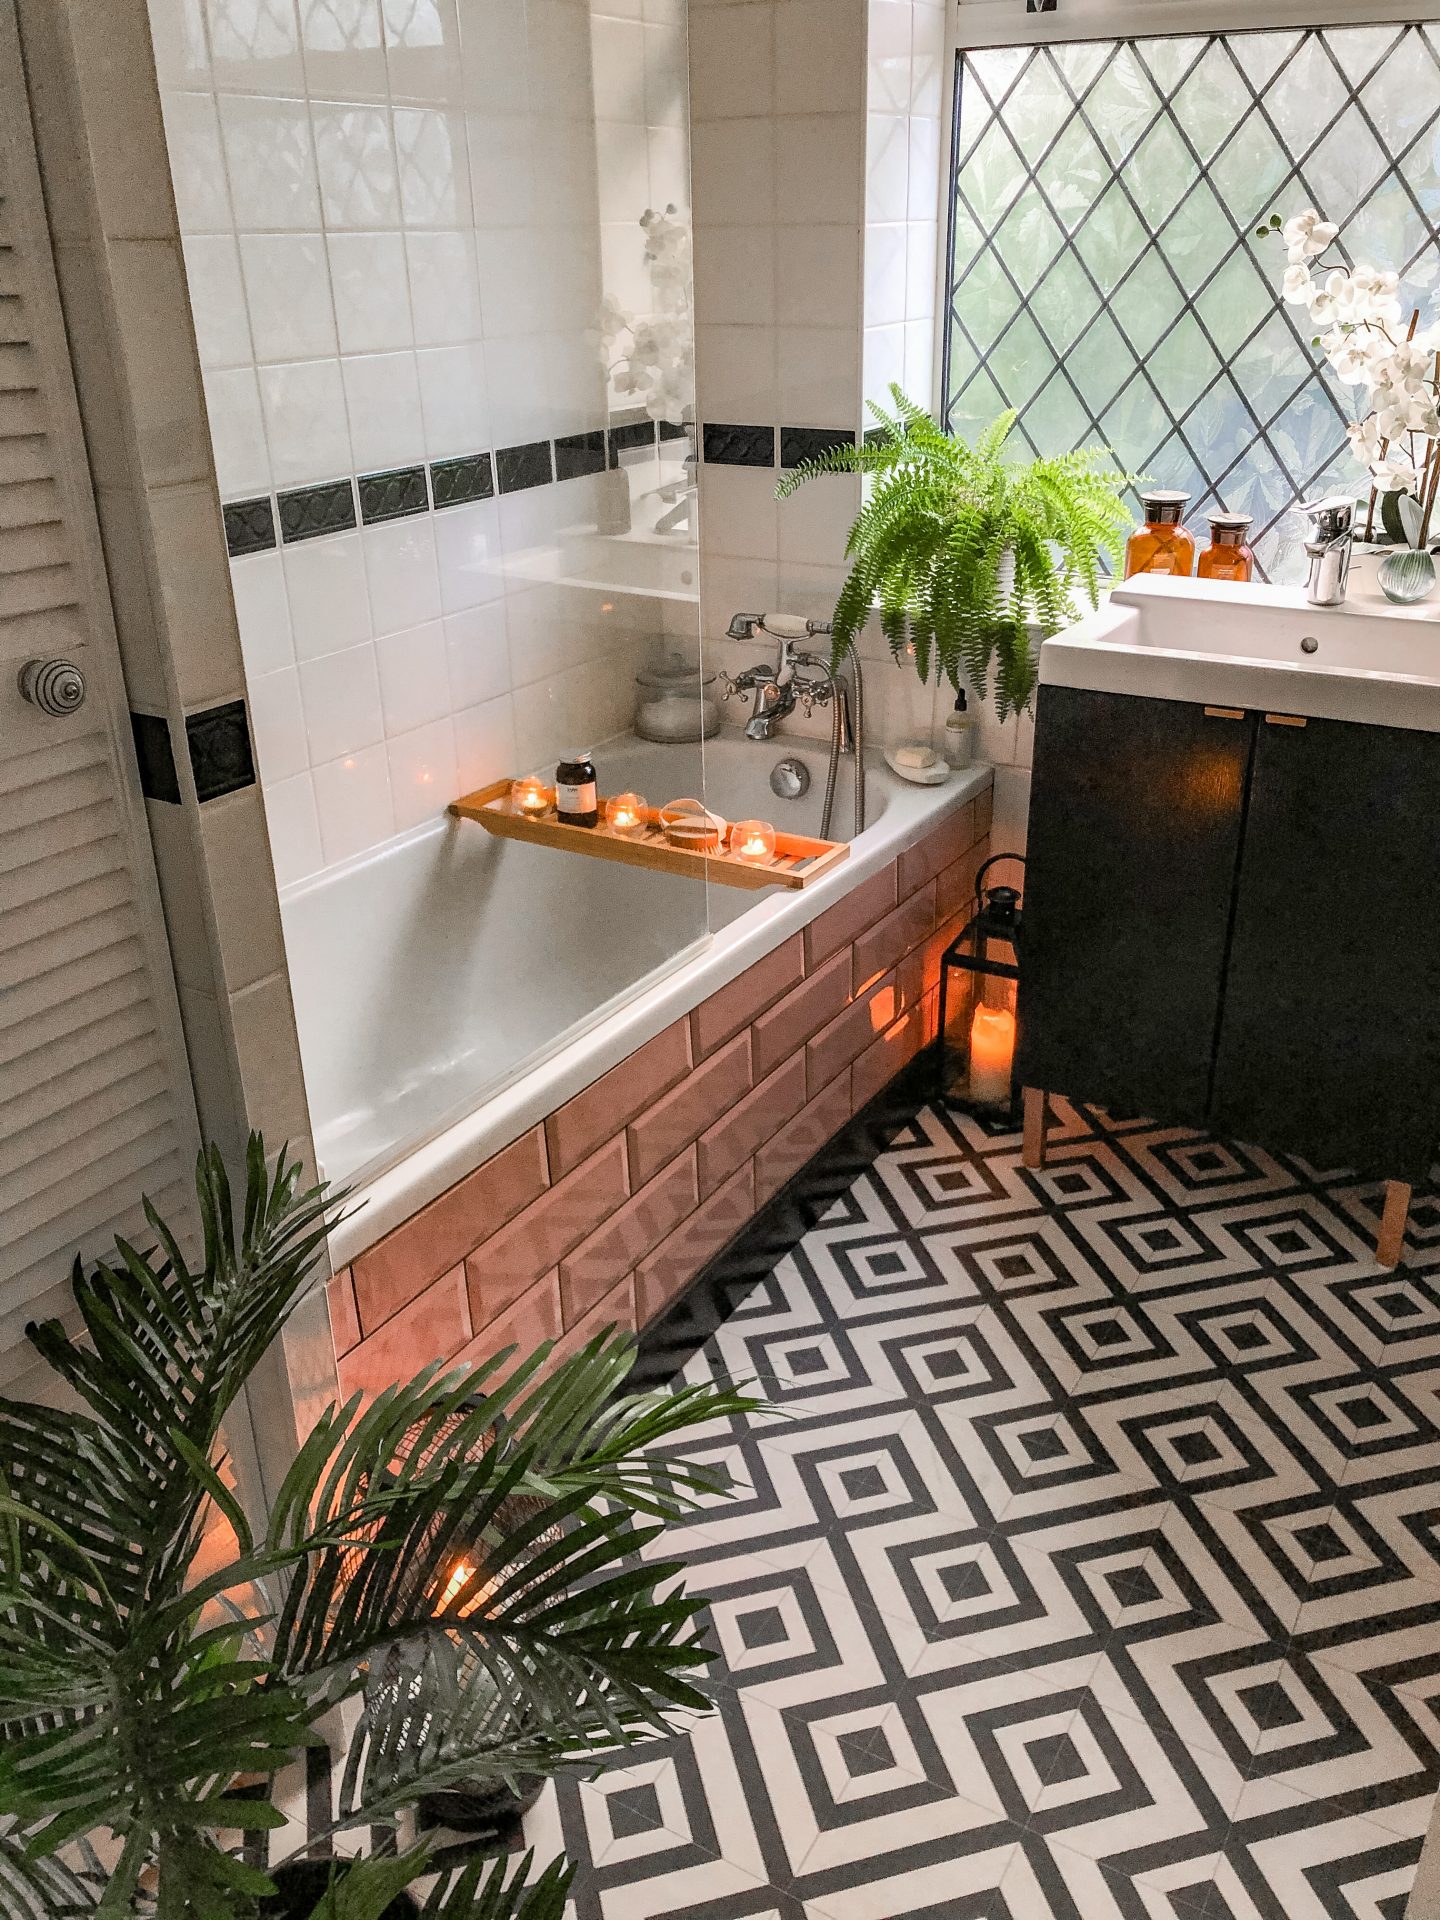
And there we have it! I absolutely adore the finished look, it’s really elevated our budget bathroom into something a little more special and of course a little more feminine, I’m so grateful to Pete for indulging my love of pink accents here and there. As I mentioned the tiles have been so easy to work with, look fantastic and are ever so easy to keep clean. I hope this tutorial has been helpful, please leave a comment if you have any questions!
A huge thanks to Tile Giant for collaborating with me on this project. All words, opinions and images are my own.
Follow me on Facebook | Instagram | Pinterest | Twitter


Love it looks great and the pink tiles are lush x
https://www.katescloset.uk/
Author
Ahh thank you Kate x
Awesome stuff. Please keep writing more things like this. I really like the fact you went so in depth on this and really explored the topic as much as you did. I read a lot of blogs but usually, it’s pretty shallow content. Thanks for upping the game here! https://www.longviewbathroomremodeling.com/
How do you get the panel off for any plumbing issues?
Author
We’re hoping that there won’t be any (optimistically) – a plumber came out in 2019 to fit a new shower and whilst he was here I asked him to check everything under the bath and it got a clean bill of health in the 6 years we’d been here by that point. This bathroom is also only temporary until we can do a full-scale renovation so I think it will only be like this for another couple of years 🙂
Looks lovely, has given me inspiration to carry out this job.
What I would do differently is actually for the tiles to a ply panel and have a couple of fixings hidden, so in the event it did need to come off, access can be granted
Author
Yes that is a great idea!! Good luck 🙂