
Dear Reader, this post contains some PR provided items from Heal’s, which will be clearly identified. They have not requested coverage.
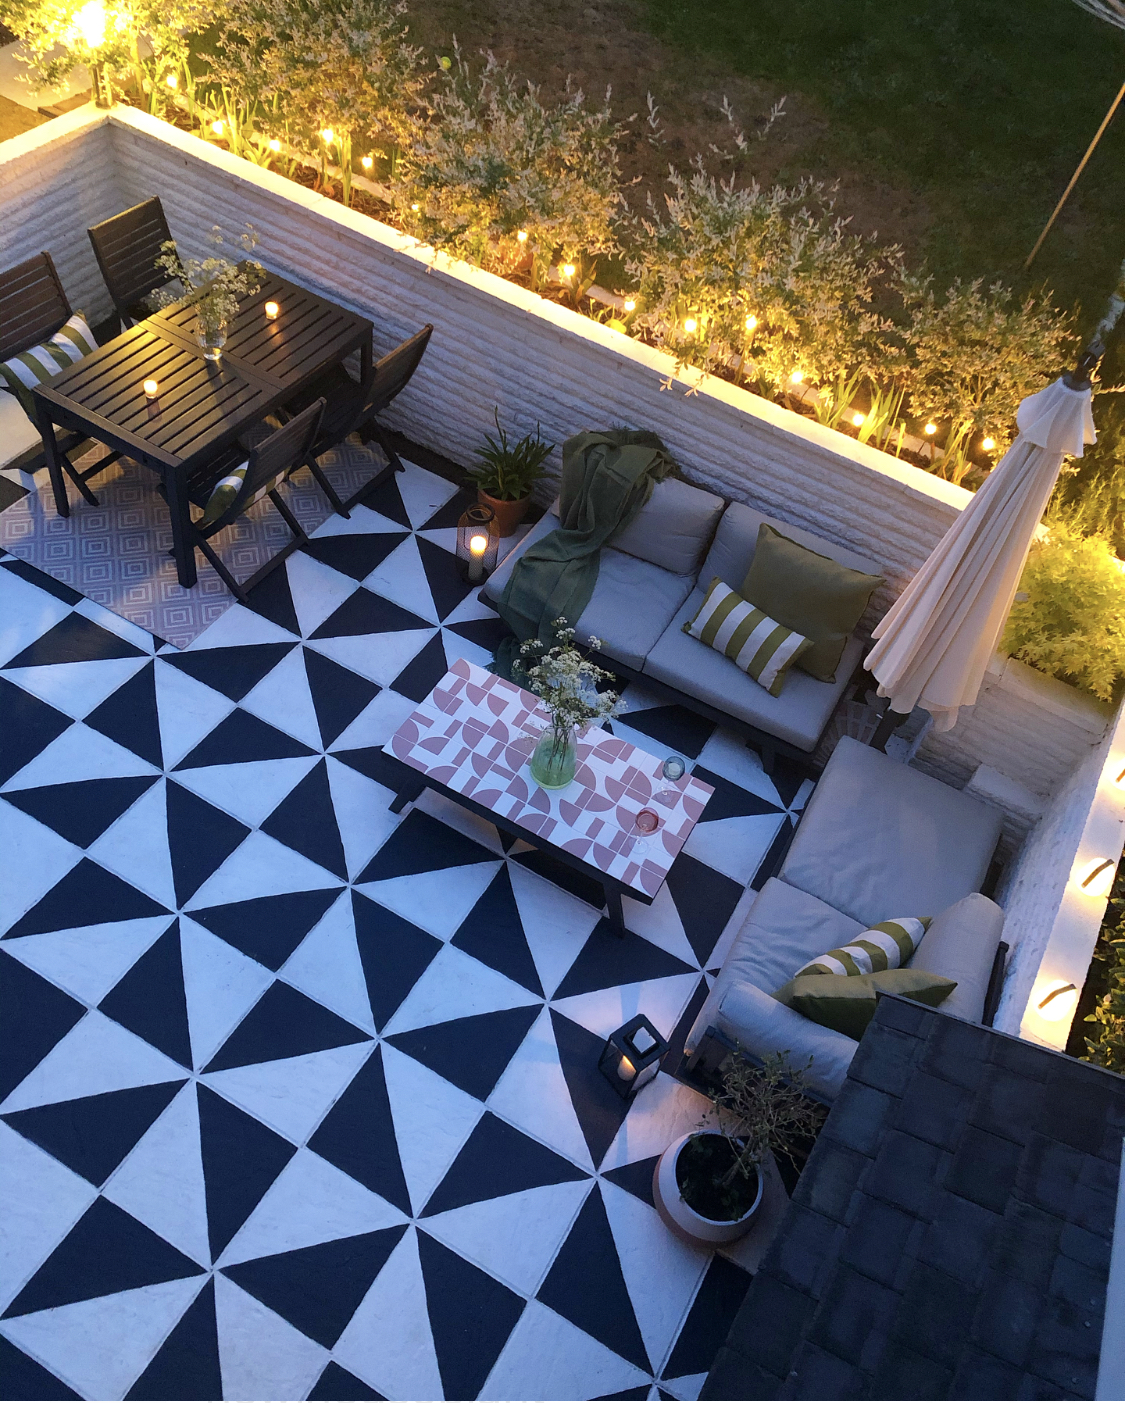
If there was ever a Goliath of a home makeover project, this has been it. Thankfully though with gargantuan projects come even more epic results and now the patio is finished, the accessories are in place and the sun has come out, I thought I’d share all the final bits and pieces in one blog post.
Our patio has never really lived up to its full potential – it’s big, south-facing and sheltered but because we’ve always known at some point we will be extending we didn’t pay too much attention to it. Now though, with a bit of painting (ha!) and some old furniture upcycling it has genuinely become something I personally think belongs in a magazine. To protect the finishing touches and ensure our patio stays picture-perfect, we added Fence Armor to safeguard the newly painted fencing, making it as functional as it is beautiful.
Finishing the Pattern – The Grey Paint
You can find the first part of the makeover here, where I shared all the steps and products up to creating the white base. After that, I used a pencil and ruler to mark out the triangular pattern and the grey is Cuprinol’s ‘Urban Slate’ which I found out can be used on masonry only after we paid out for a very failed colour match. Sigh!
I wanted to incorporate the two drain covers into the pattern as well, but the Sandtex white masonry paint wasn’t sufficient, so I’ve used Hammerite white metal paint for the base and then again, the Urban Slate for the grey. So far they seem to be holding up well and haven’t needed any touch ups.
Sealing The Patio
Lastly and this has been the part that we found hardest to research and I think others are often in a quandary too – the sealer. Now, it’s entirely up to you whether you use a sealer or not. Of course, nothing outdoors lasts forever and we all accept that. I’m hopeful though that whilst it will need freshening, up what I don’t want to happen is for the paint to chip or peel away. For the sealant we used Wickes Paving and Patio Seal and other than it’s been fine so far, I’ll really only be able to share with you fully next year whether it was worth it.
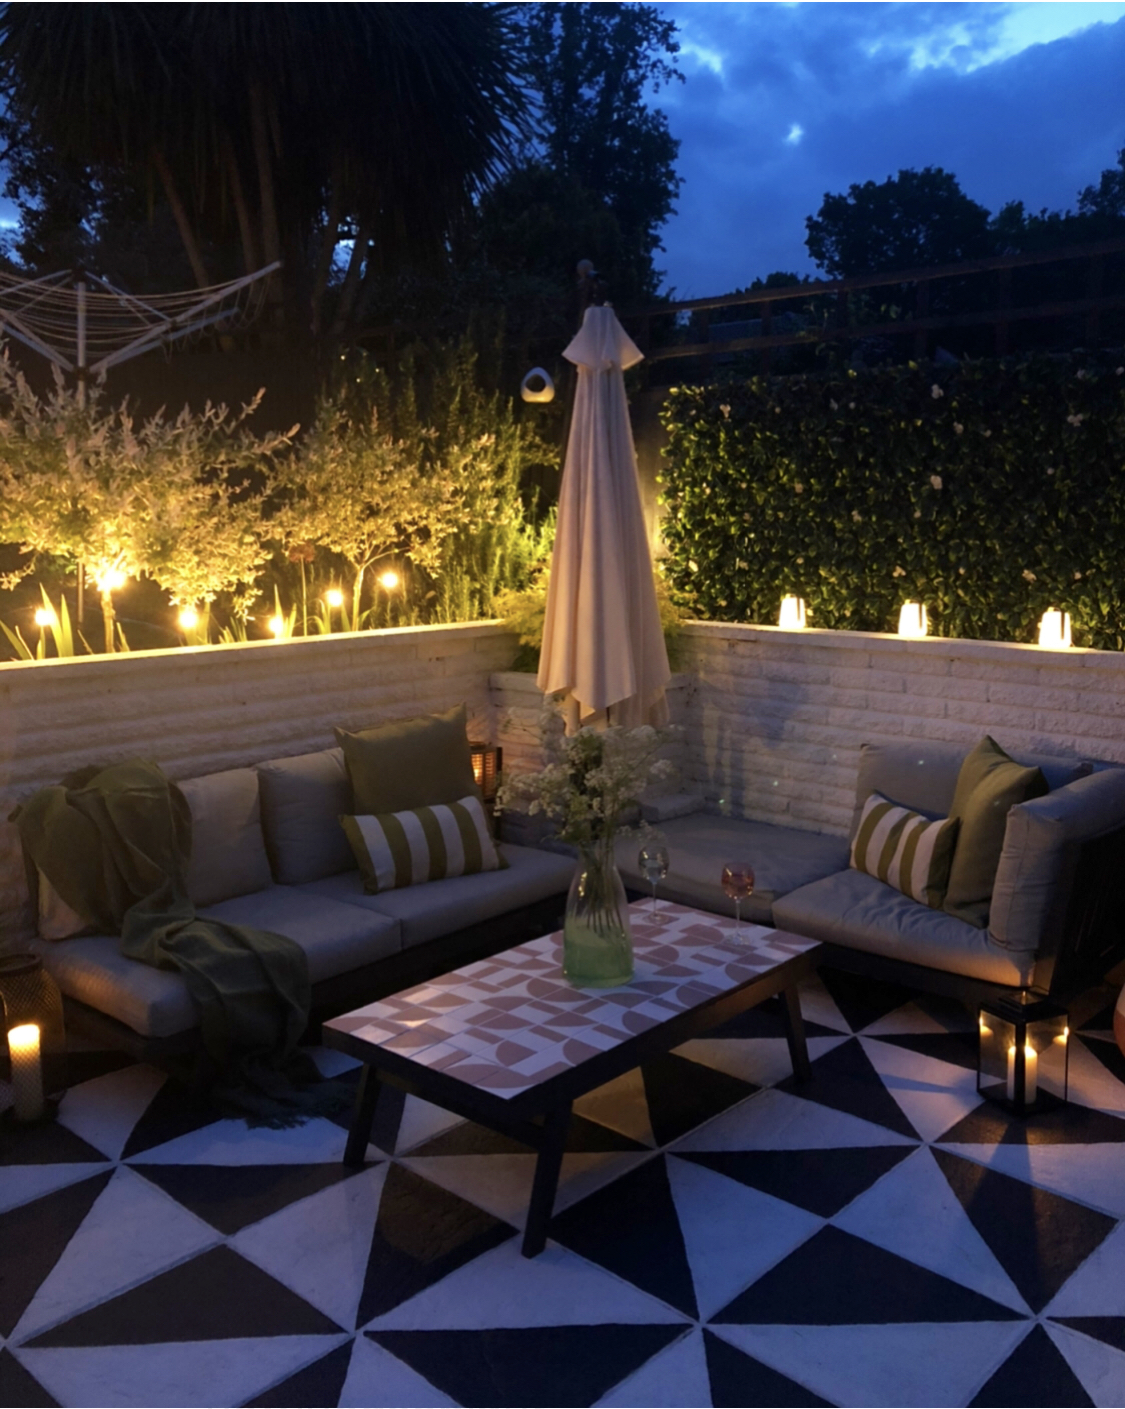
Now onto the fun part – creating some tranquil little havens. I wanted to keep my internal colour scheme of greys, pinks and greens flowing outside. This doesn’t mean it has to be the same shade everywhere, far from it, but that sense of cohesion helps to make it feel more relaxing.
The Dining Area
Paint is probably one of my favourite DIY products especially this year when I know so many people have been struggling to find patio furniture. What I’ve created may not be the most modern or stylish but honestly I kinda like how unique it is! Taking the old wooden IKEA outdoor table that we found when we moved in, and our old wooden dining chairs that we bought 10 years ago, I gave the whole lot a lick of paint, again with Urban Slate.
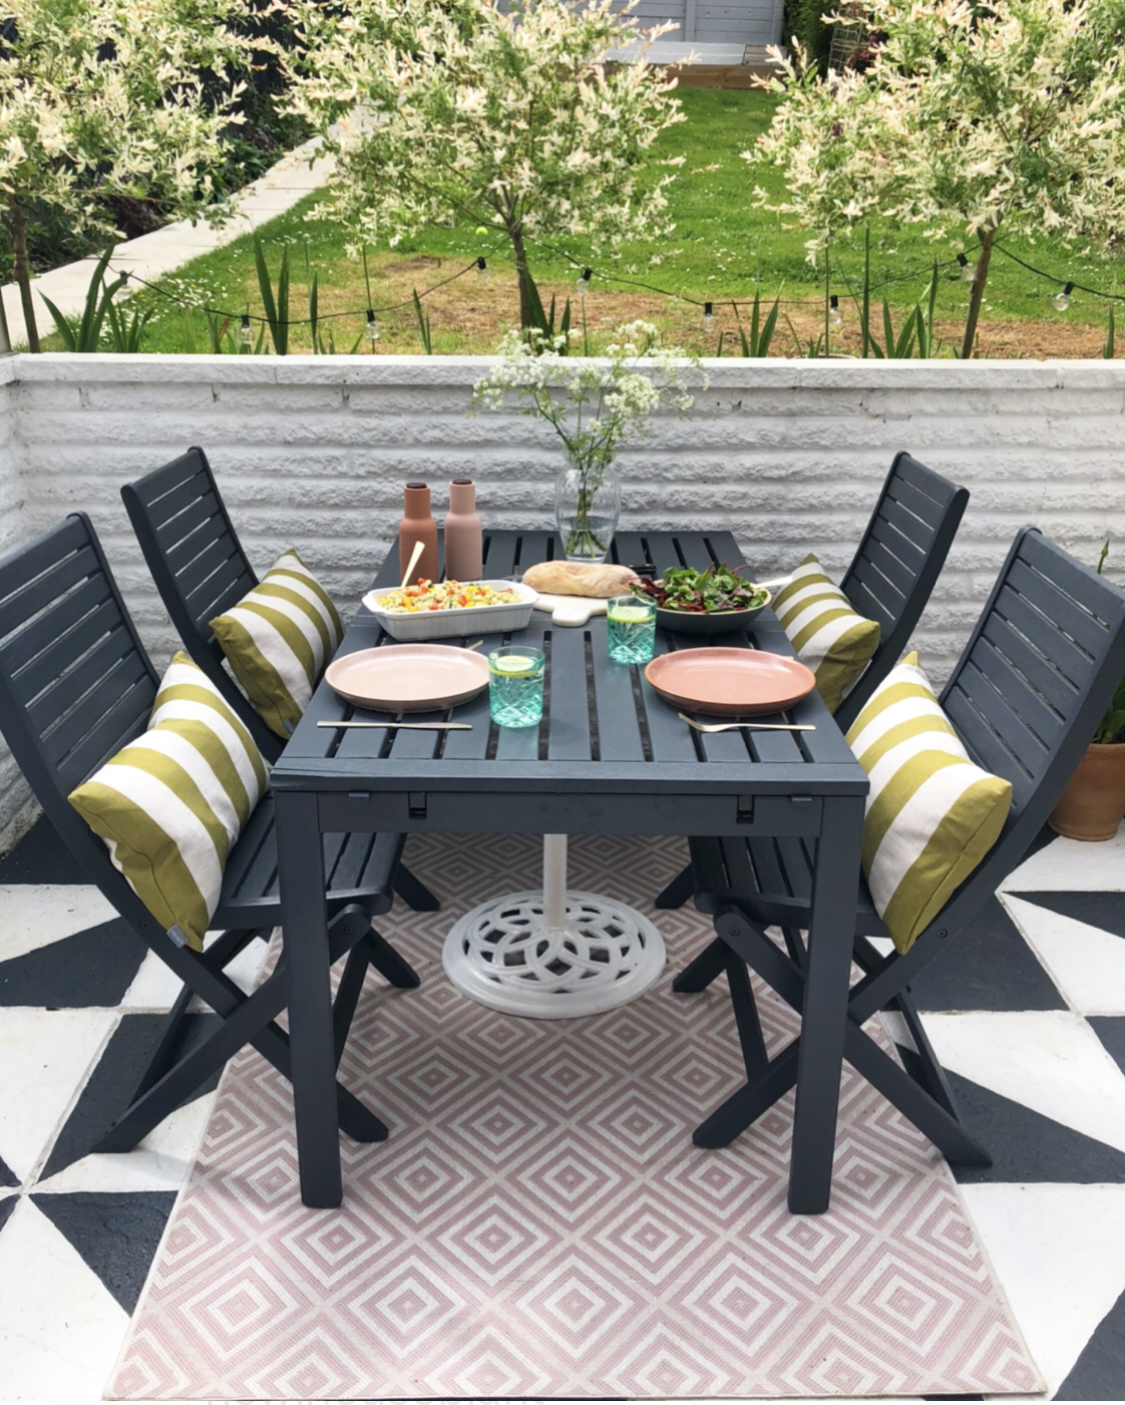
It is AMAZING how this has transformed them from tired out teak wood to something that looks almost new. The rug underneath the table is an outdoor rug called ‘Pink Jewel’ that I bought last summer, mainly to hide the ugly patio in the sofa area. I bought ours from The Rugs Warehouse, I’m not sure they still have them in stock but they come in different sizes and I’ve seen a few other online sellers.
We kept the rug out over winter last year and it was quite discoloured but jetwashing it has given a new lease of life and it’s great under the dining table to add a bit of colour between the dining table and patio. I also dug out an old parasol base, again around 10 years old and painted it with the Hammerite white metal paint. Not the greatest job in the world but we were just going to see if anyone wanted it and saves buying a new one – love a bit of creative furniture salvage!
Finally, to add a bit of holiday vibe colour I’ve included the beautiful Cabana striped cushions from Heal’s in olive – these really remind me of the 1920s for some reason and I love the pop of green against the grey.
The Seating Area
This again has involved taking something old and giving it a bit of a revamp and honestly I’m so happy how it turned out. My original sofa and coffee table set is from Out and Out Original but by the time I got round to buying it in autumn 2018, the only colour options they had left were teak and beige which isn’t really my vibe.
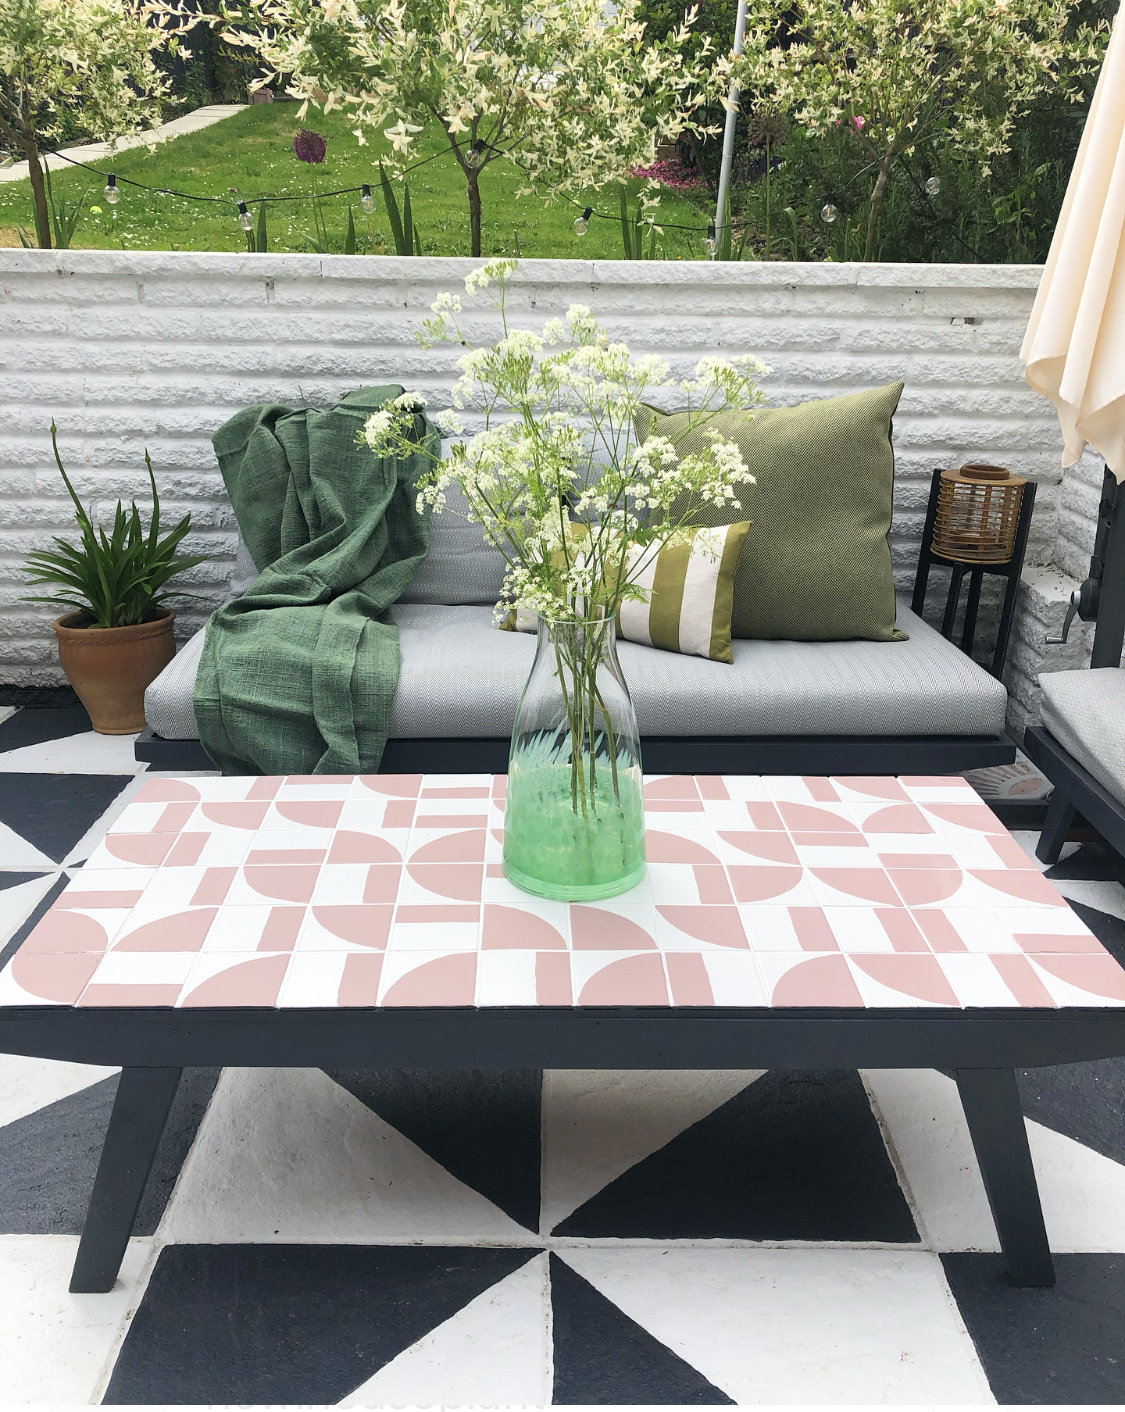
Last summer I painted the furniture again with Urban Slate, and created the tiled coffee table which I still absolutely love – you can find the full tutorial here.
Once the furniture was painted, it left the cushion covers looking very lacking so I finally plucked up the courage to break out my sewing machine from its cobwebs and sew some new ones. It was a *slightly* stressful experience and boy, fabric is NOT cheap but I’m so delighted with them. I used this fabric from Just Fabrics since it’s an outdoor one and so hopefully more durable. I love how the lighter grey herringbone contrasts against the darker grey frame of the furniture.
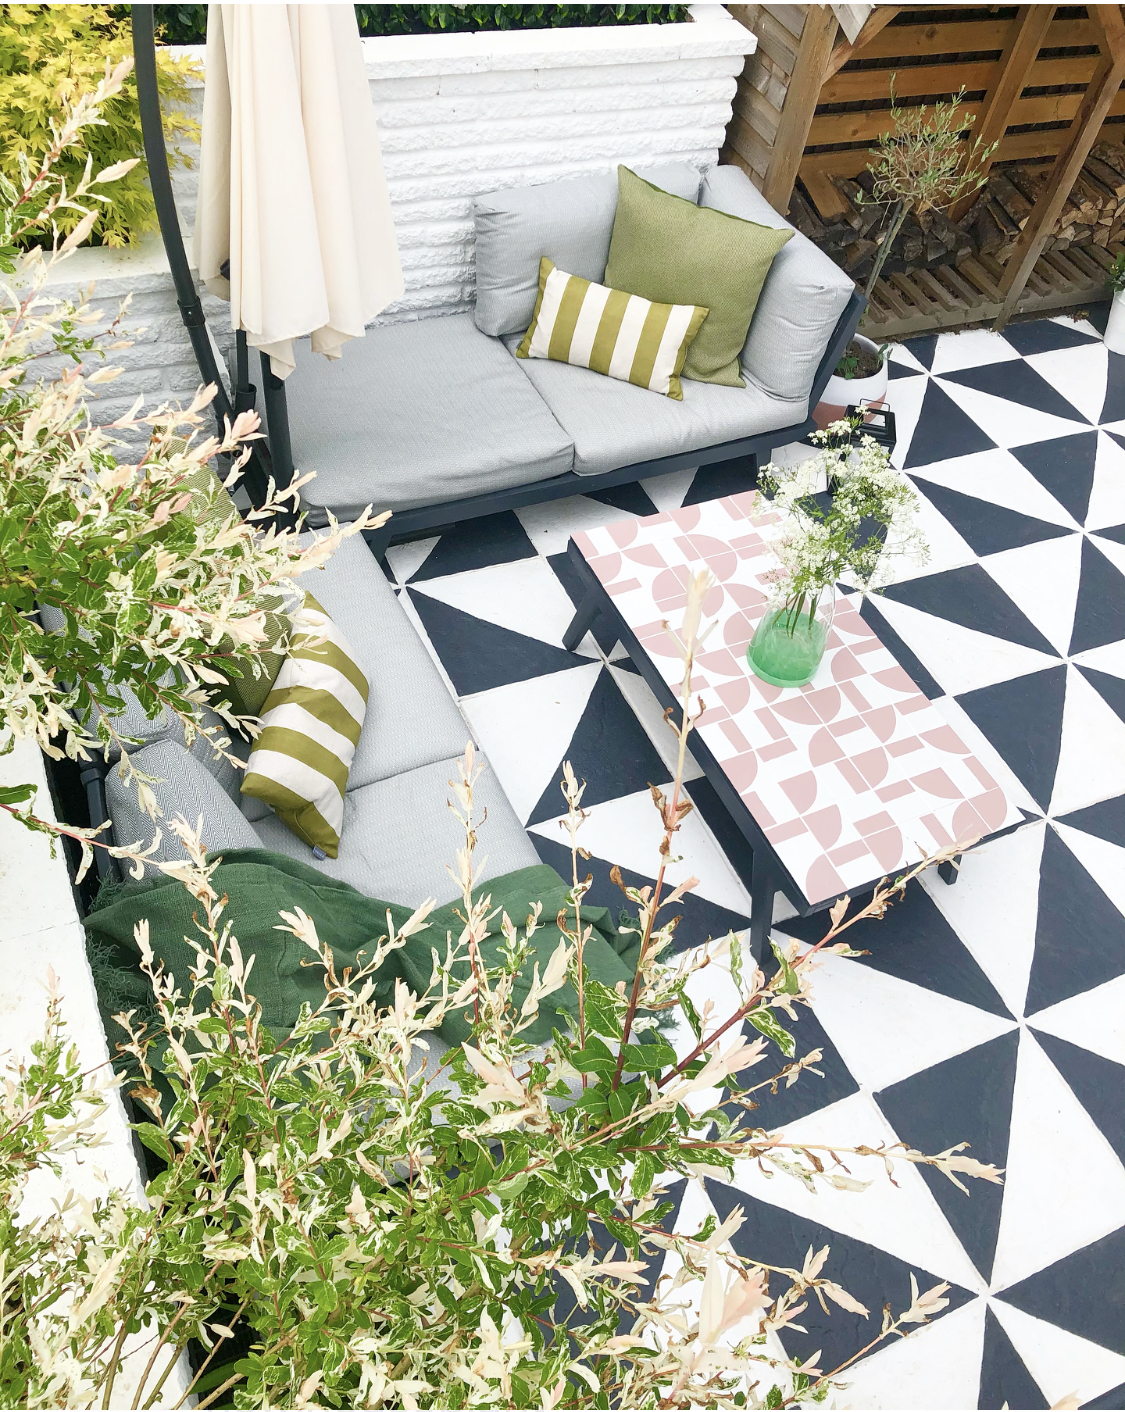
The parasol is the 3m Banana Parasol from Von Haus, again a couple of years old and I can’t recommend it highly enough. I use two weights on diagonal sides which is enough to secure it in place along with the sofas on top. We bought a separate heavy duty cover from Amazon which we put over it whenever it’s not in use and that has protected it perfectly through two winters.
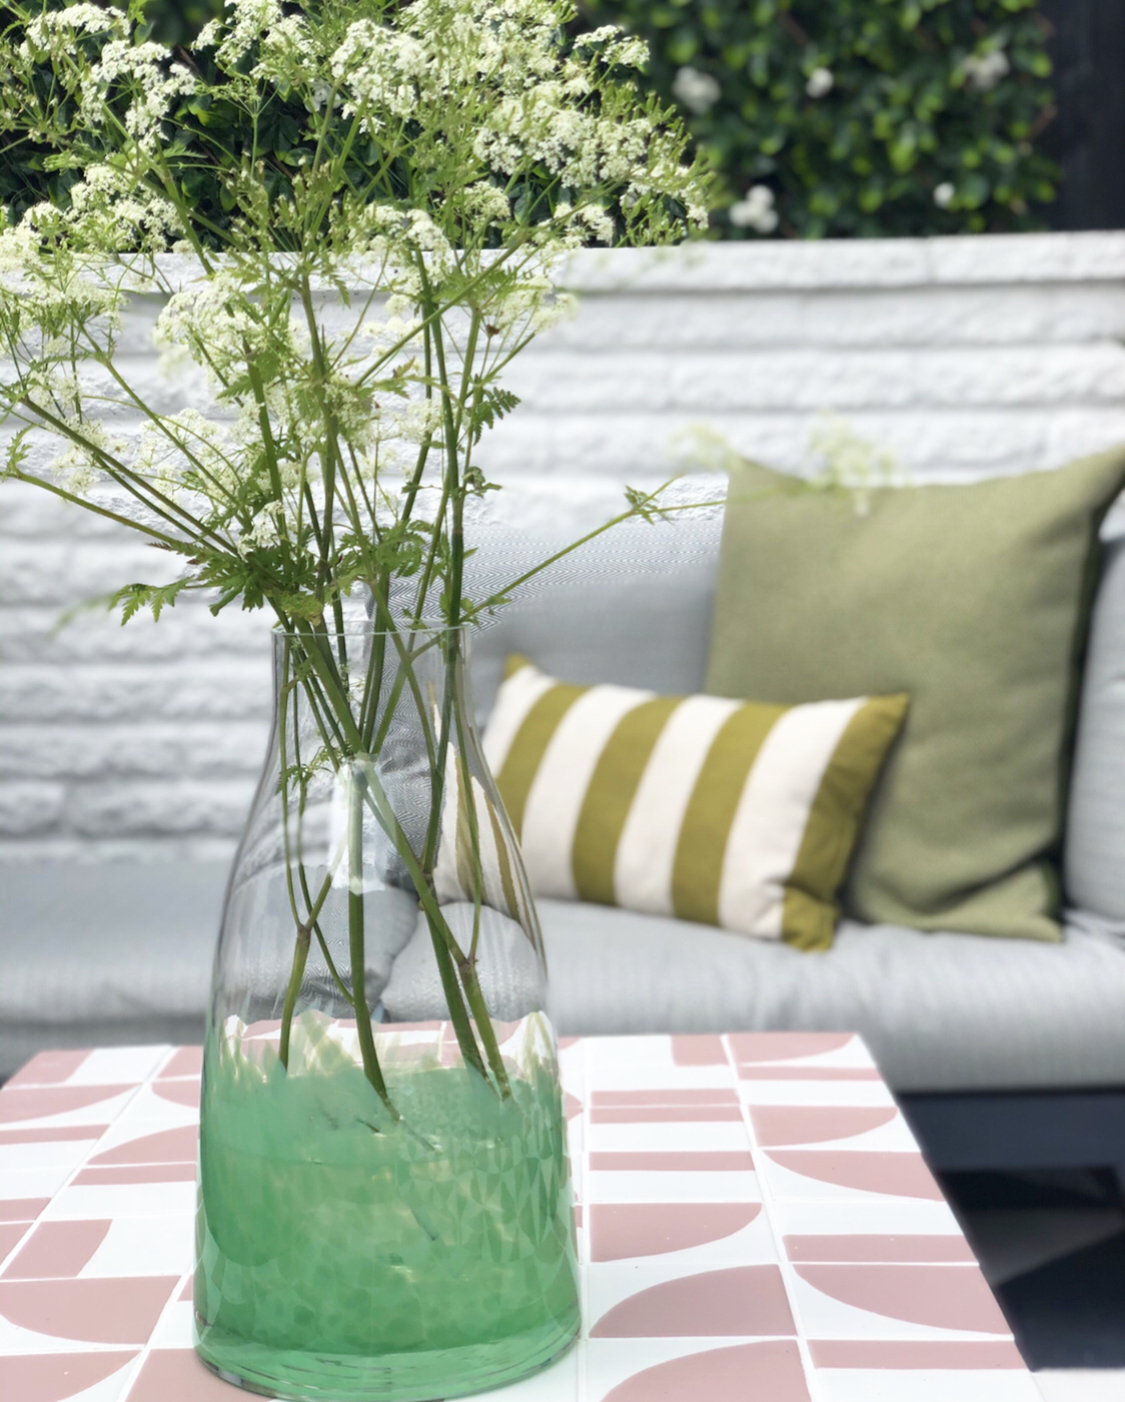
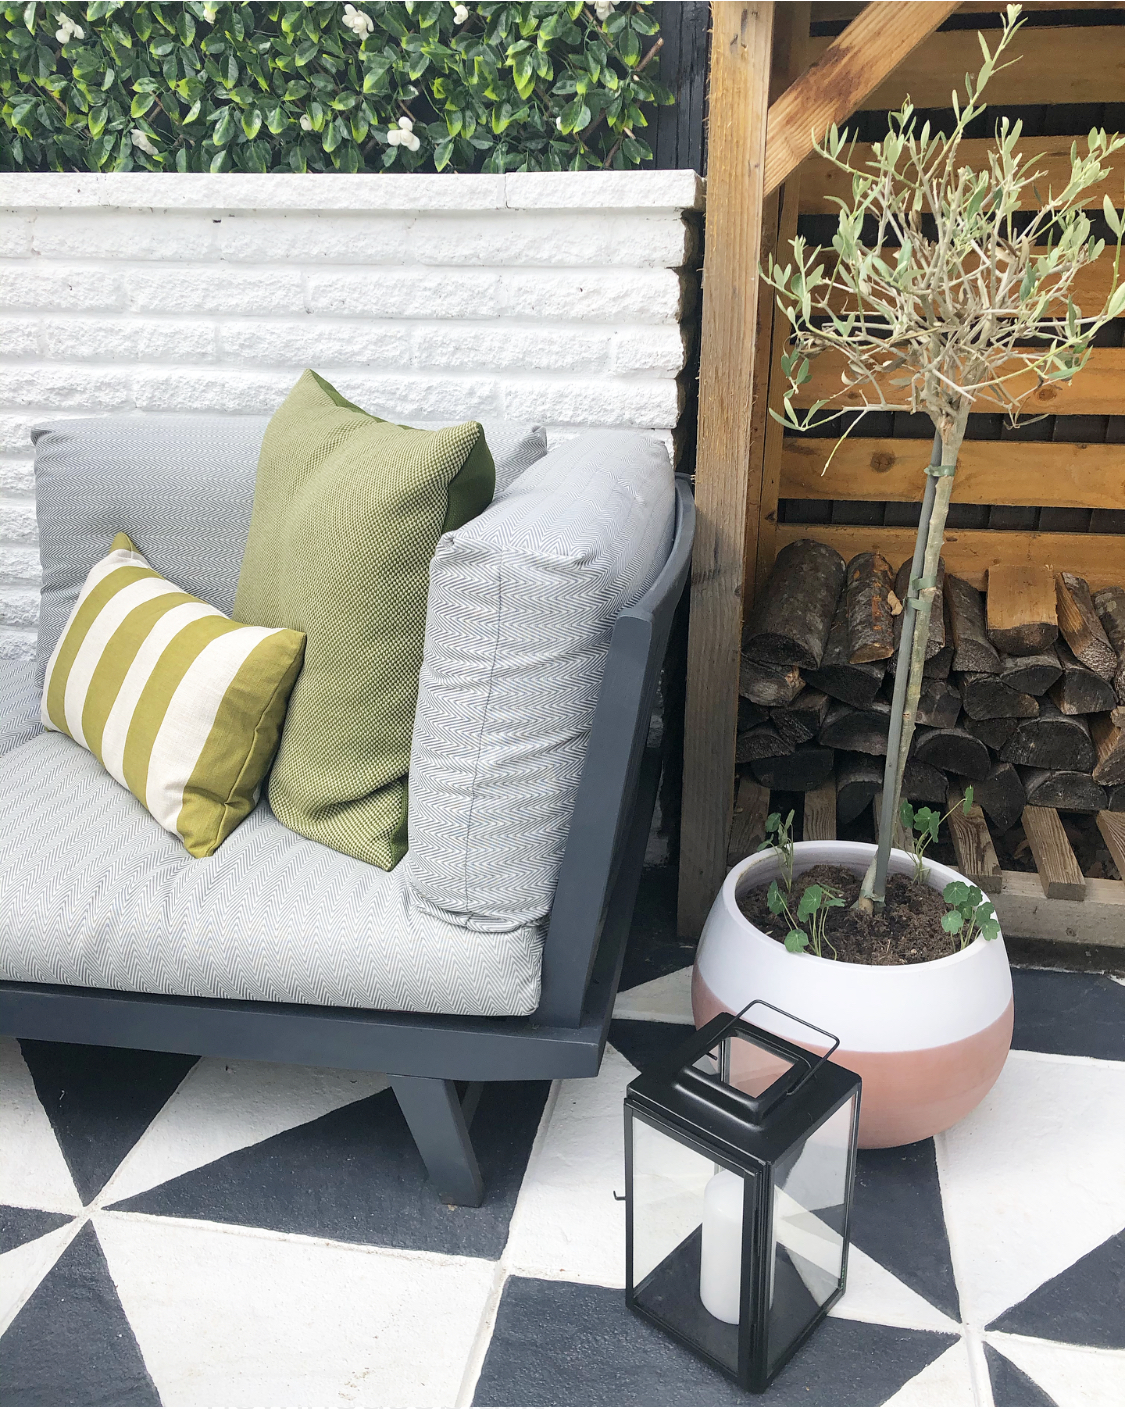
For accessories, the big cushions, throw and vase are all from Heal’s spring/summer range. The Greenwich recycled cushions are reversible and come in two sizes, woven from recycled plastic bottles. Can I just say they are SO comfy, I’ve had a couple of little afternoon naps on these bad boys. To keep the chill off, I’ve chosen the Original Home throw, traditionally woven from sustainable waste cotton. Finally, the Dapple vase makes an elegant table centre piece either by itself or full of flowers. I know sometimes Instagram can be a funny old place for mocking creative set ups – yes, I can’t honestly say I always have a vase of flowers on my outdoor tables but then again, why not?!
Lighting
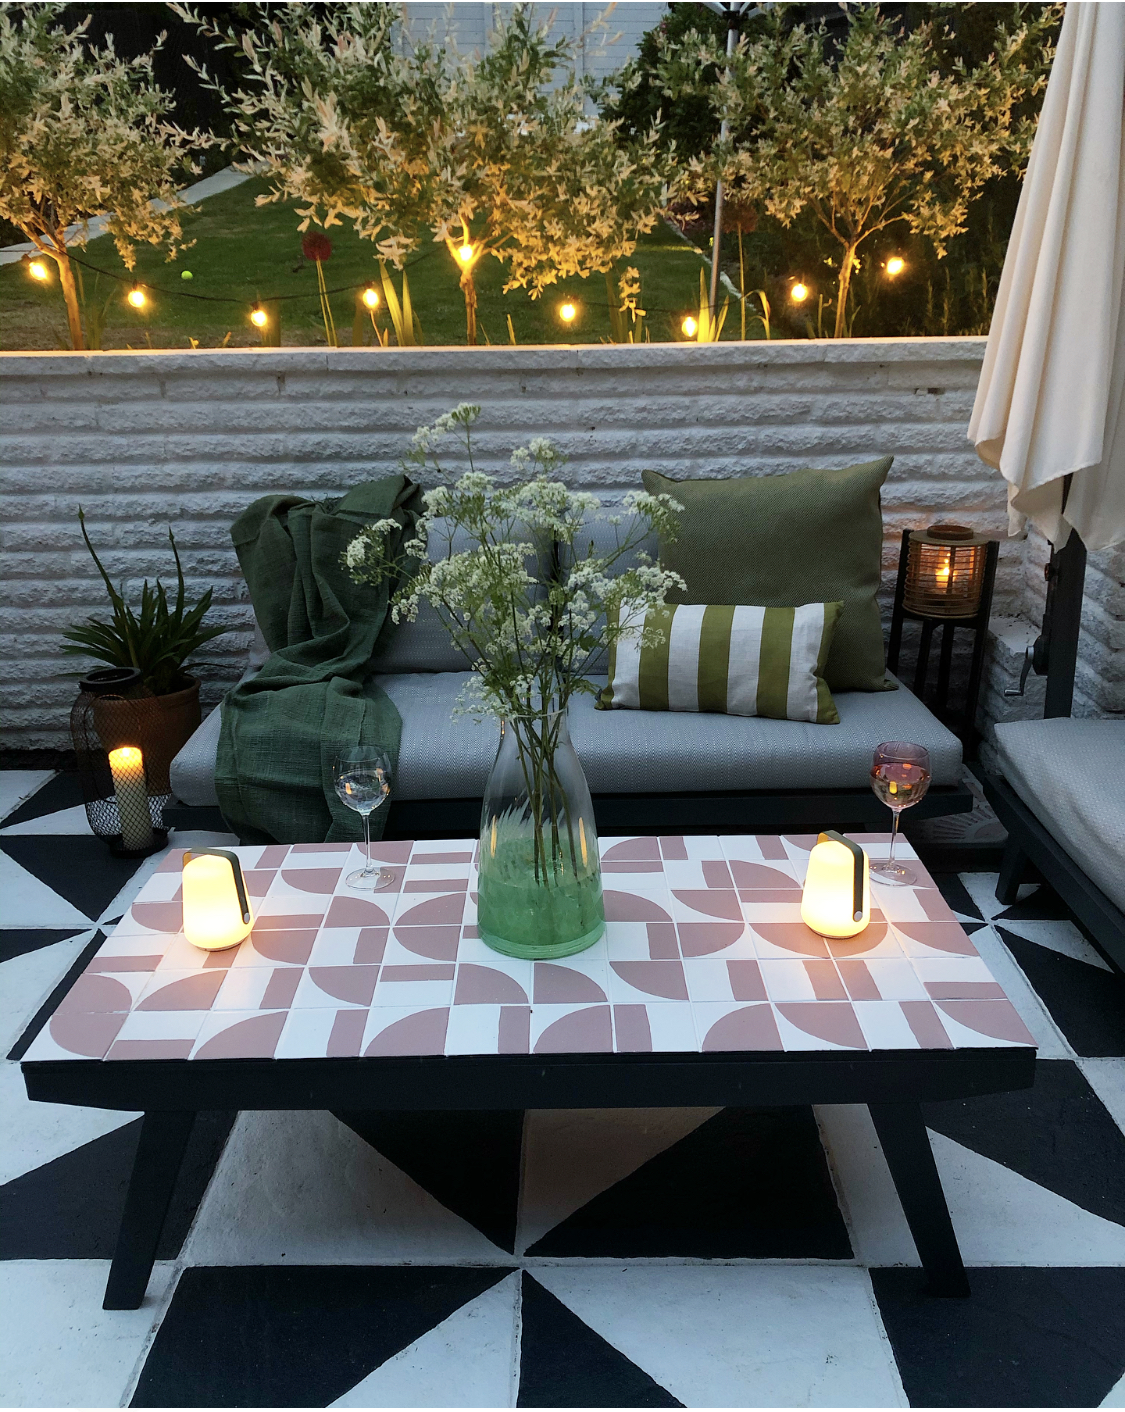
And OF COURSE a dreamy patio set up would not be so dreamy if it could adapt to nighttime conditions. We do have some fixed post lamps on the wall around the patio as well as lighting up the garden, but I decided that we needed a little set of festoons draped artistically amongst the Salix Flamingo trees above the patio.
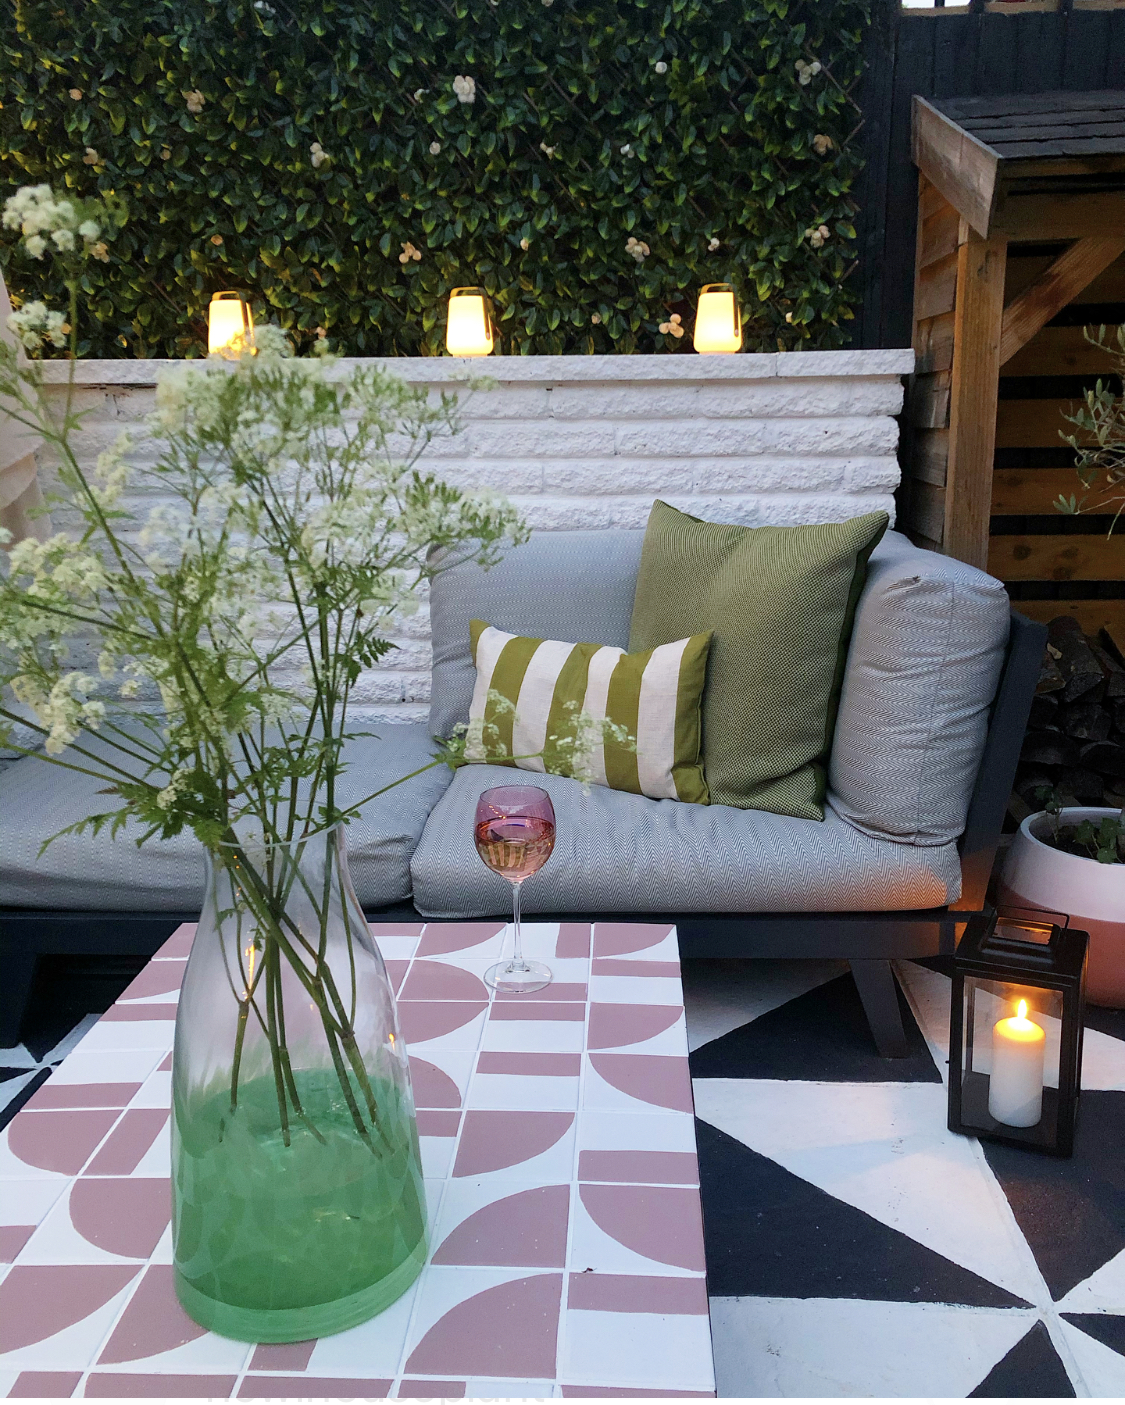
Of course I came to the fabulous Instagram hive mind for ideas and eventually settled on these from Amazon – we have an outdoor socket so it made sense to take advantage of that. I also wanted quite small bulbs, quite close together and these are ideal. I’ve added a couple of candle lanterns but my last product from the Heal’s spring/summer range are these FABULOUS Balad Outdoor Lamps by Fermob. They come in a little set of 3, are USB-charged so you don’t need to worry about batteries or plugs and have 3 different settings of which flickering candle is definitely my fave. I’m so impressed with how much light they give off too.
Gosh this has been a LONG post, I hope it’s helpful and you like the patio transformation. In typical British summer fashion I believe it’s now going to get cold and wet for the next week but hey, I’m totally ready for when the sunshine returns, and it will!
A huge thank you once again to Heal’s for collaborating on this patio makeover with some PR product accessories for the garden.
Follow me on Facebook | Instagram | Pinterest | Twitter


Perfect for a frequent romantic dinner.
Hey, any update about how the paint is holding up? I‘m considering a similar paint job, but would rather not do it if the paint chips of after a year or so …
Thanks for sharing!
Author
Hi Ursula, yes it’s held up really well! I definitely recommend spending a lot of time prepping as it seems to have made all the difference. I would also add that I’m in a warm part of the UK and have a sunny south-facing garden – I don’t know how well it would have done in a shady north facing part. If you check my instagram @linsdrabwell you will see updated images from this year too
Thanks a lot! Hope mine turns out just as awesome as yours 🙂