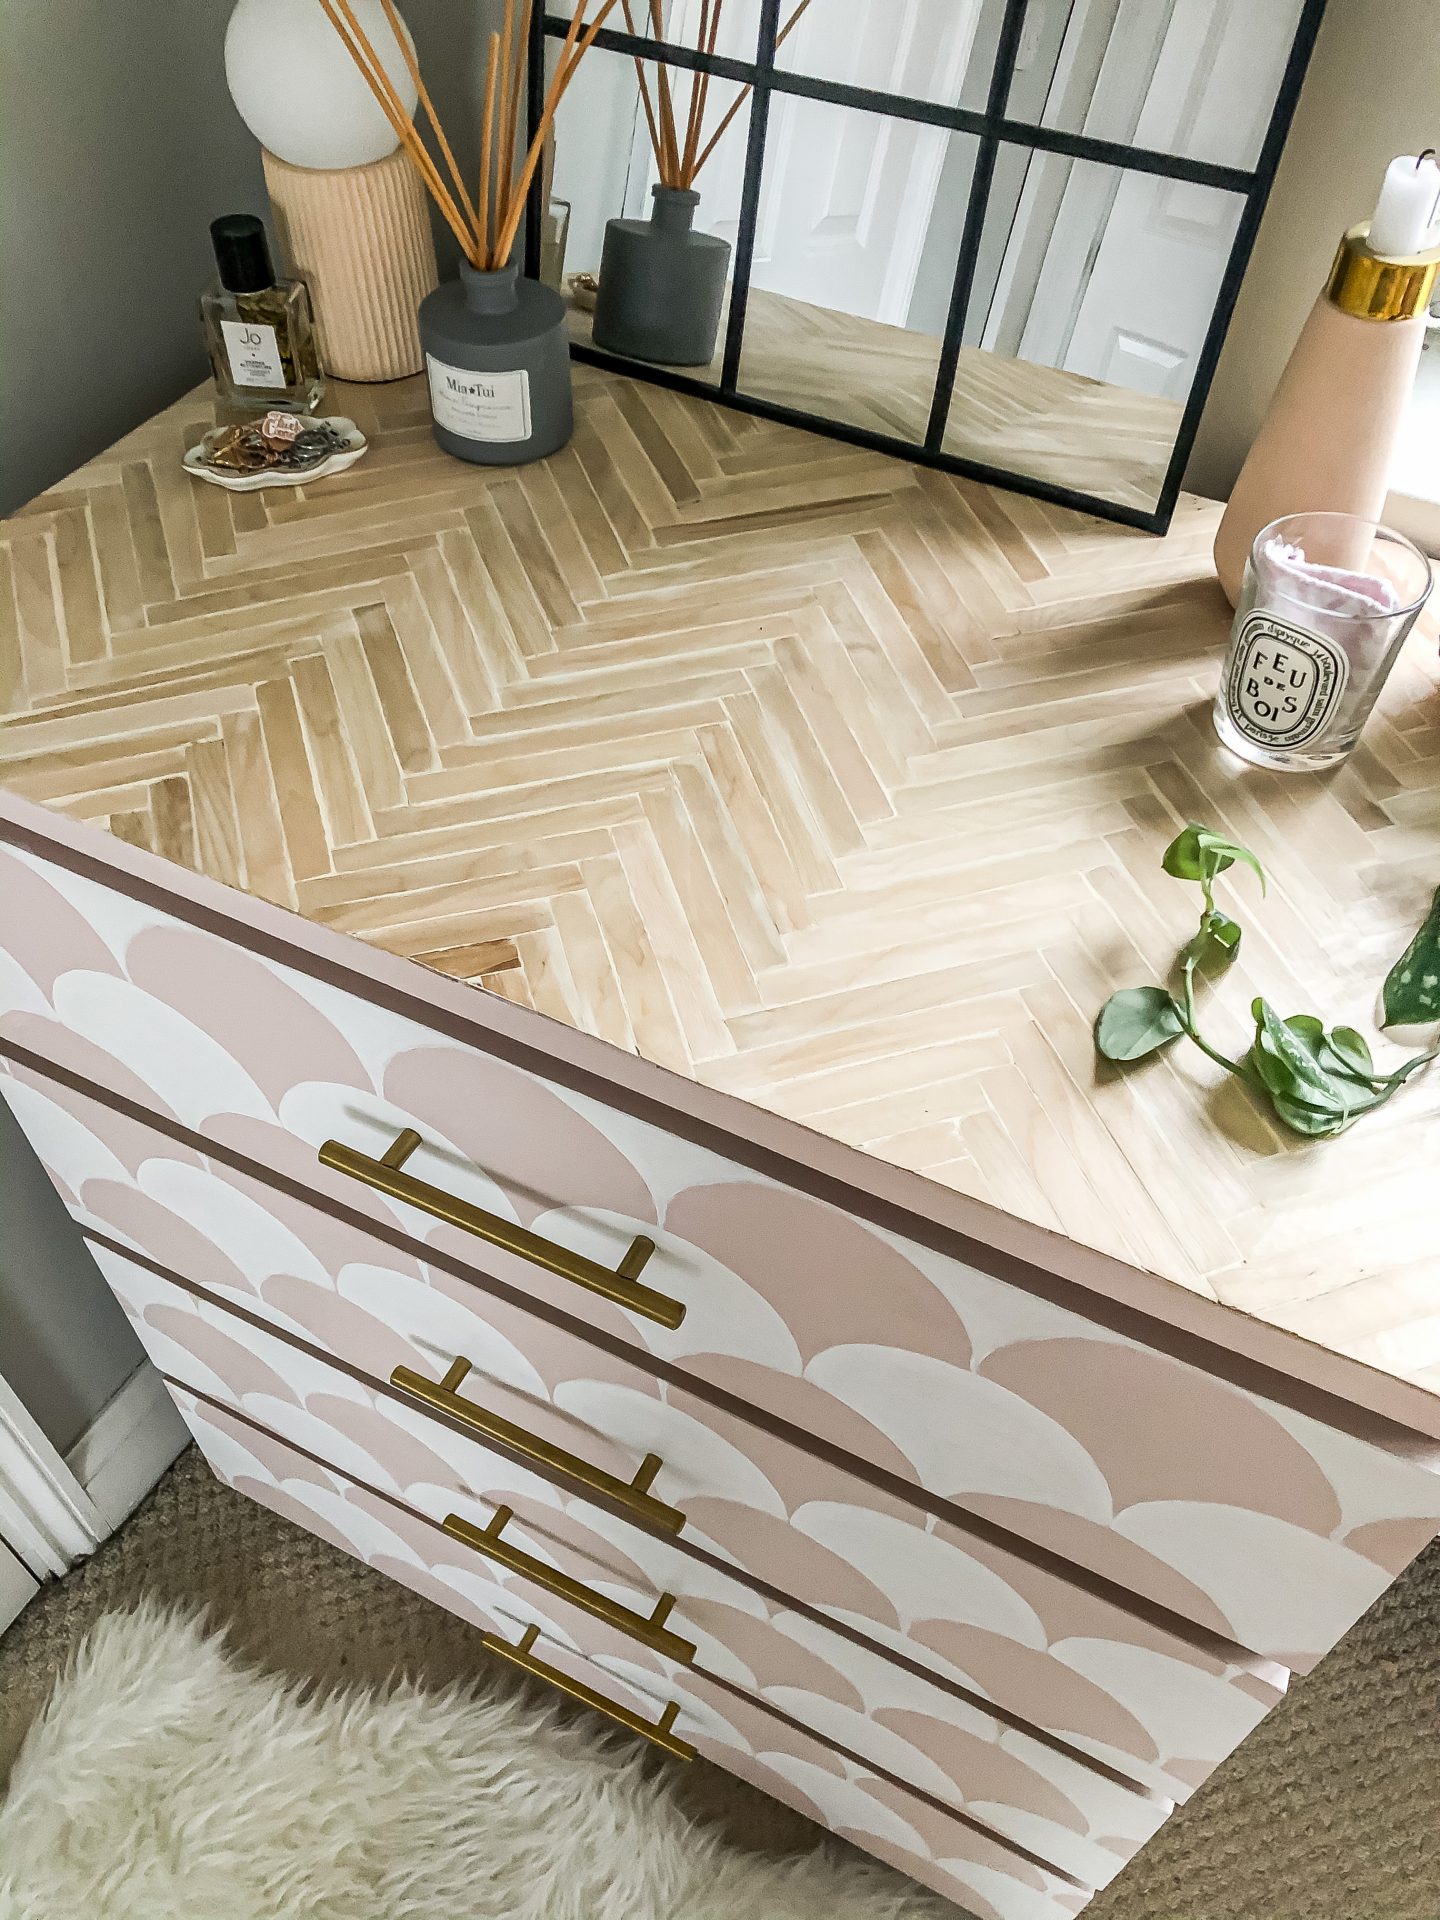
If there’s one thing I never thought I’d be doing with my life, it would be using jumbo lollipop sticks to upcycle furniture. As it turns out though, it’s a pretty effective way of giving something very bland a bit of luxury look makeover, for fairly low cost and I am definitely here for that.
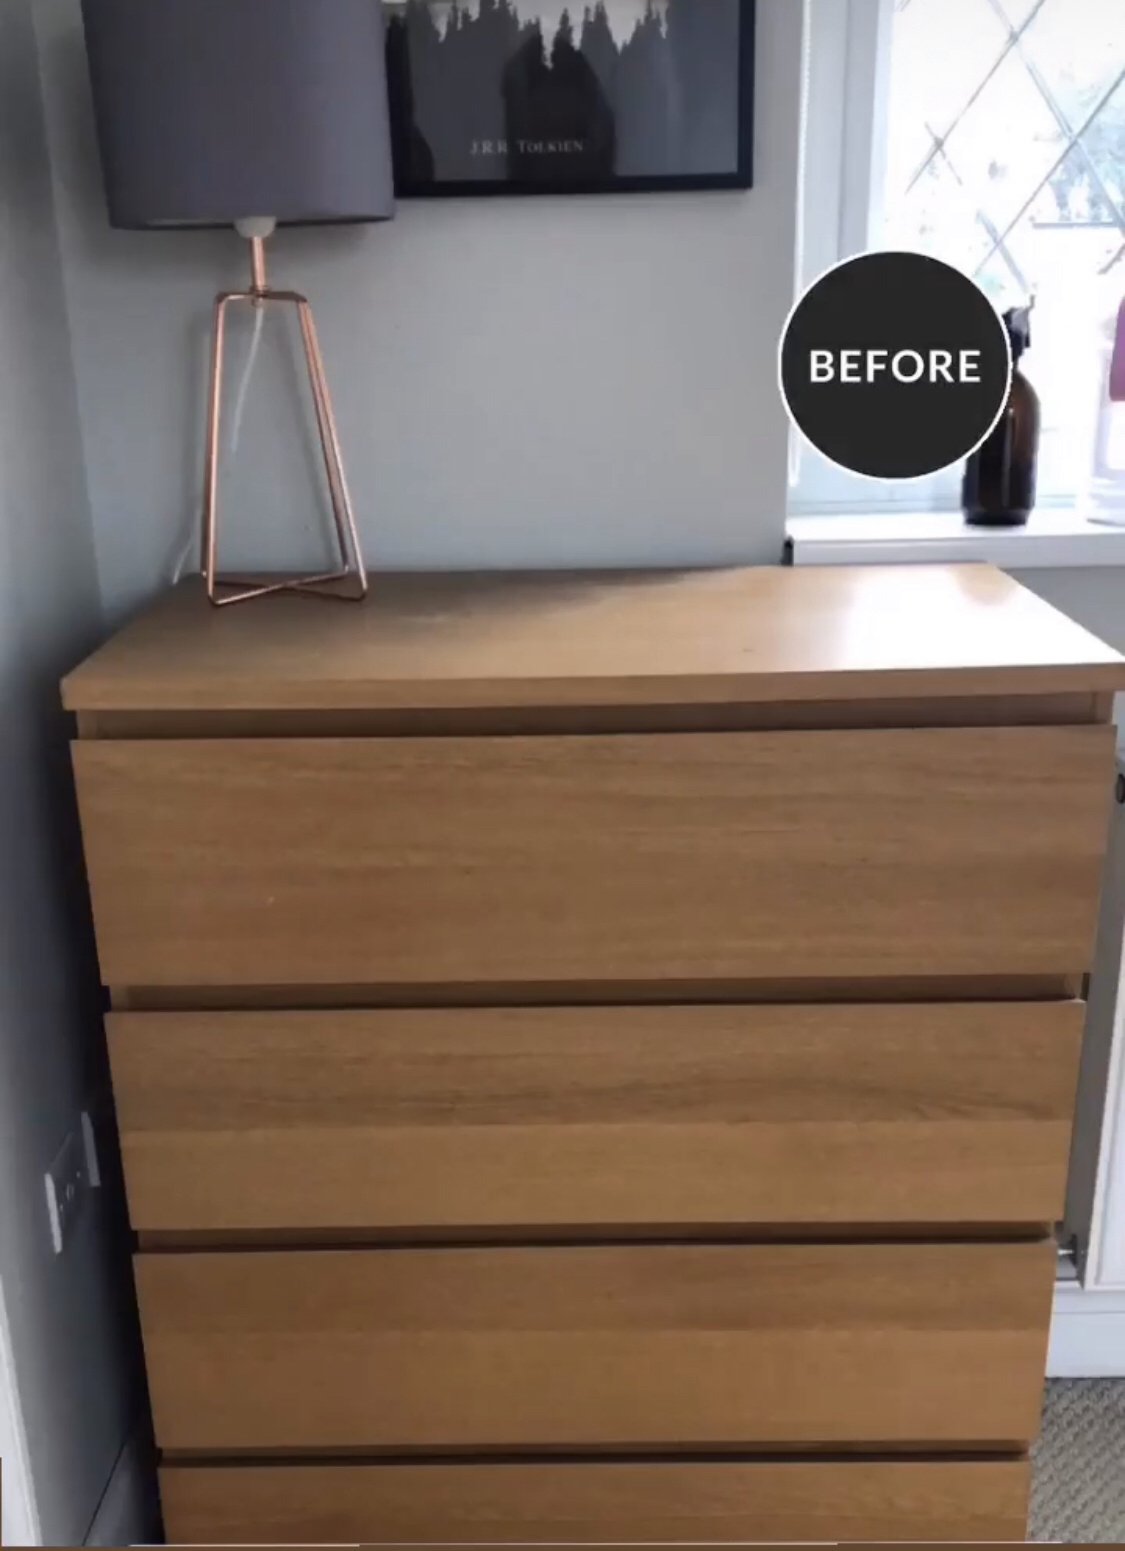
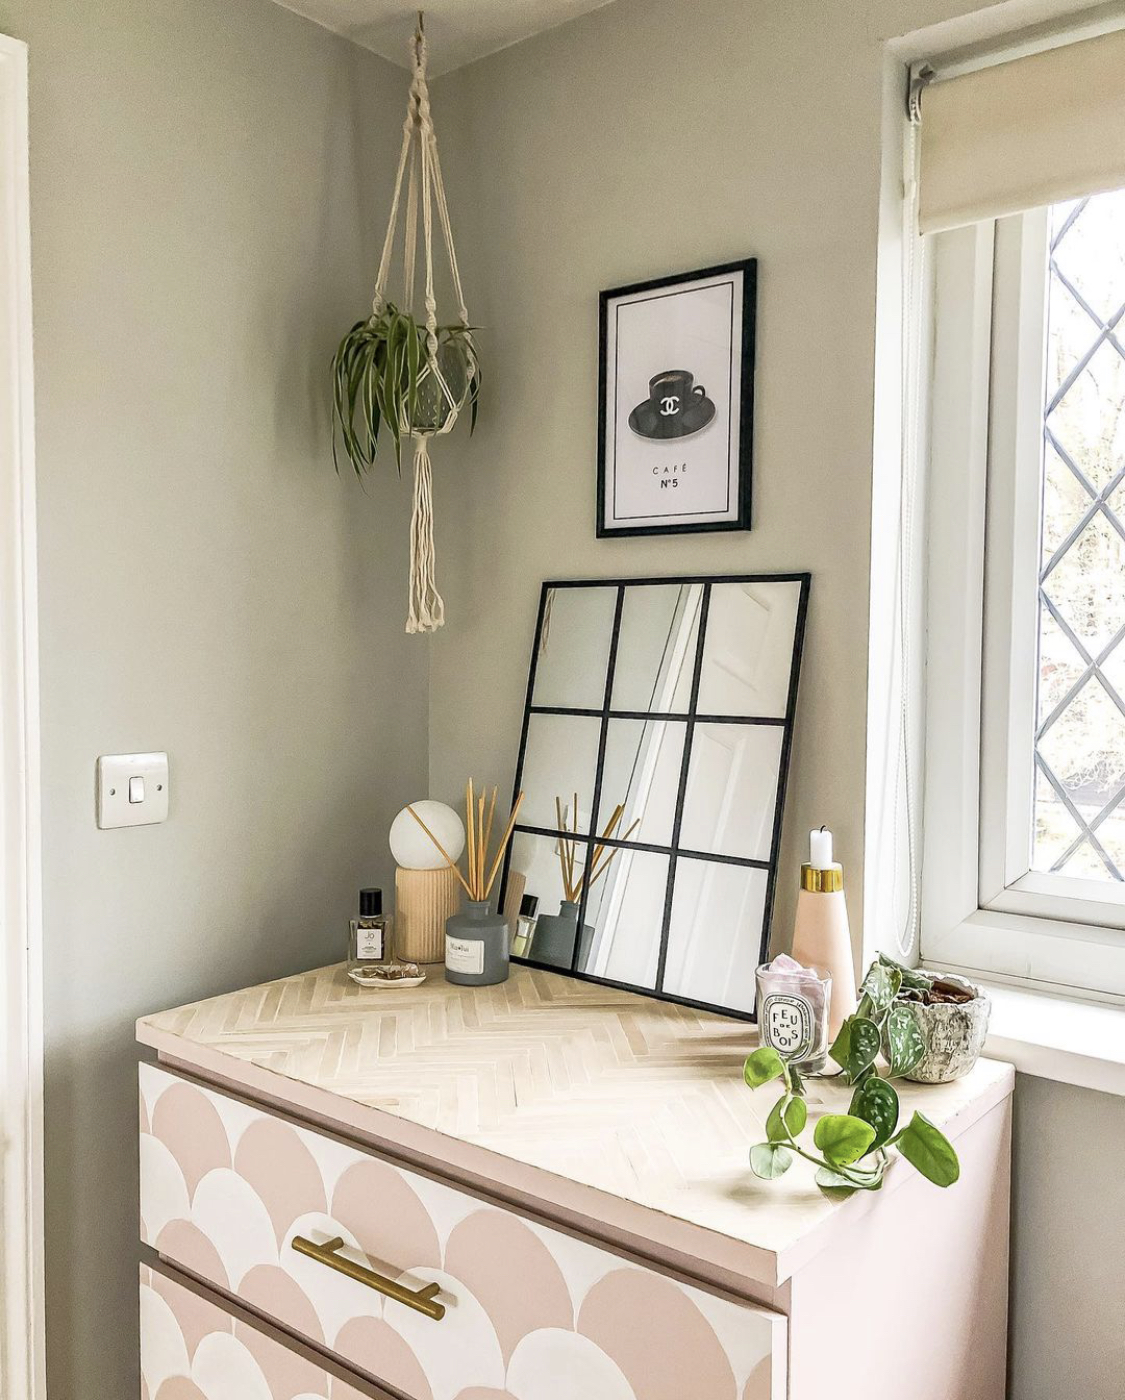
Its been about 4 months or so since I completed my herringbone-look top for a set of Malm drawers in our bedroom and that’s long enough for me to be able to say with certainty that my method seems to have worked out ok. There’s nothing worse than completing a project, sharing it with you immediately and have it all fall apart a week later.
So without further ado, here’s what you’ll need for a lollipop stick project:
- Furniture of your choice
- Jumbo lollipop sticks (I ordered these from Ebay here)
- Pencil, tape measure
- Glue gun or no more nails – basically very strong glue
- Scissors/mitre shears to cut the sticks
- Wood filler (I used this one)*
- A hand sander (we have this one)*
- PVA (I used this one)*
- Optional – depending what piece of furniture you’re covering, you may want to use a wax or similar to finish with, especially if you want a different colour than sanding and the PVA will give. I haven’t yet done this step.
And here’s what I did!
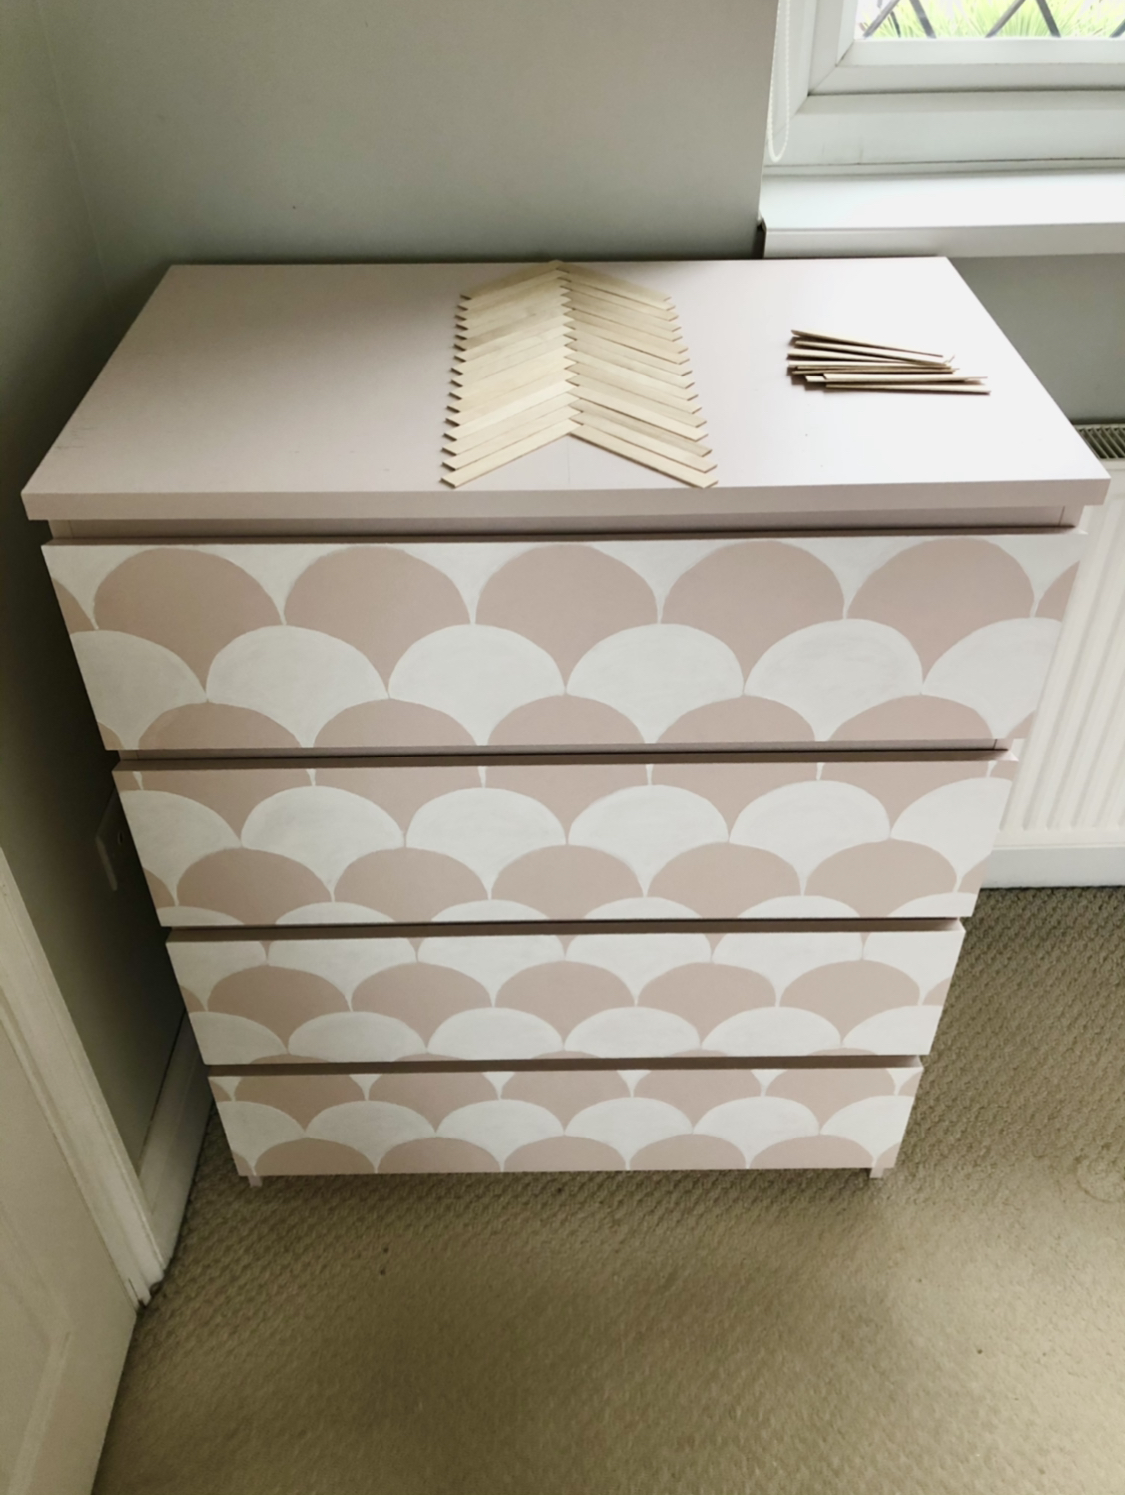
Step One – Decide on your pattern
I knew I wanted a herringbone pattern for the lollipop sticks, where they are laid down at right angles to each other. Now, snipping the ends of your lollipop sticks so that they’re flat at the end instead of curved isn’t essential and I’ve seen some amazing projects where the whole lollipop stick is used. But if you want to do what I’ve done, you will need to snip both ends off your sticks with either scissors or mitre shears. This isn’t the easiest job, sometimes the sticks will split and after a while it’s quite painful on the hands but it is worth it.

Using a pencil and tape measure, I marked the midway point at the top of my Malm drawers surface, so this could be the starting point for the herringbone pattern. I wanted to start in the middle so that I could then work my way out to the edges and make the pattern as symmetrical as possible.
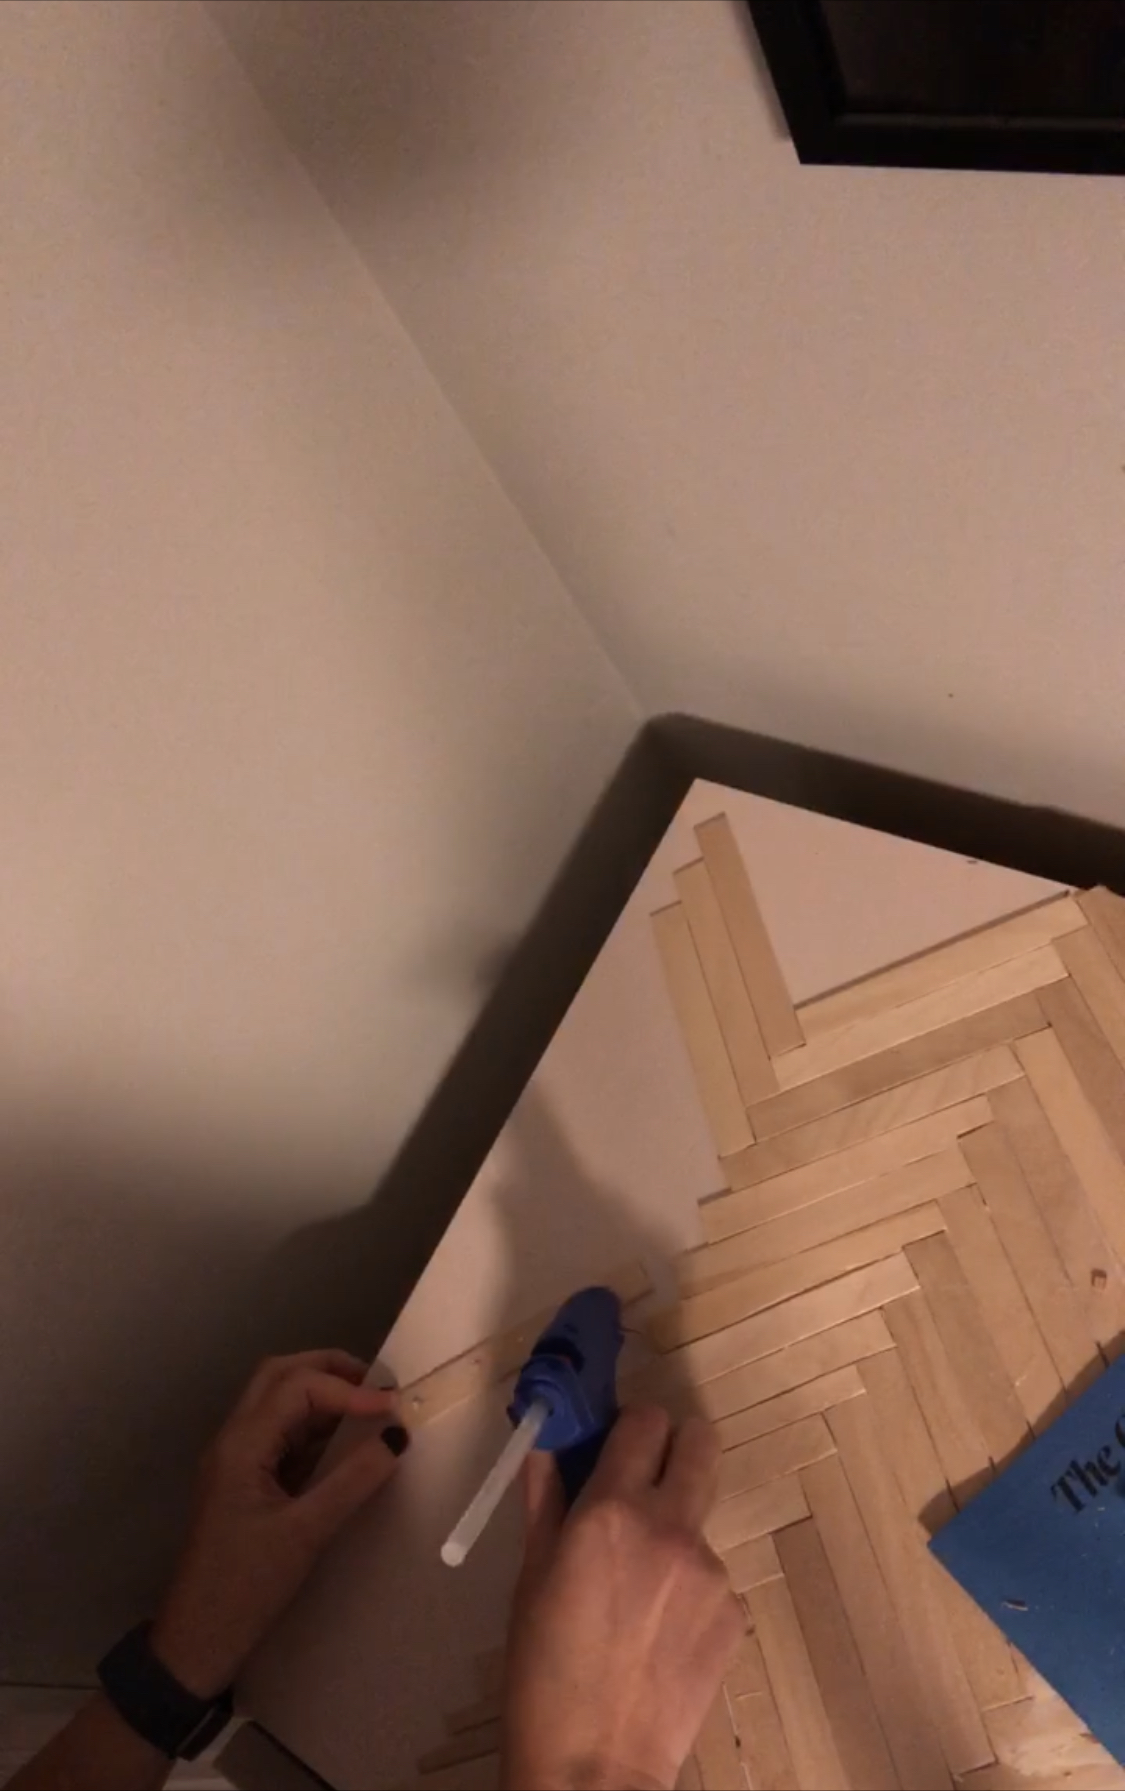
Step Two – Start gluing
I had never used a glue gun before but I found it was probably easier to use this than something stronger – on the couple of occasions I wanted to reposition the sticks, it was quite easy just to pull them up, re-glue and lay them down again. You’ll want to lay the sticks at right angles to each other, all the way from the top to the bottom of your surface to create a kind of spine – essentially your mid way point and guide from where all the other sticks will be laid.
I noticed with my lollipop sticks that some of them were ever so slightly bowed on one side, so I made sure to stick the flattest surface down rather than the bowed surface and this seemed to work better.
Step Three – keep gluing
I can’t honestly say this is a project for anyone that lacks patience because if you want it to look good you need to take your time and do it properly. It will be worth it though. I worked my way out to the left first, and then the right. I think for my entire Malm surface I maybe got through around 5 sticks of glue on just a little mini glue gun.
When you get to the edges of your surface, you’ll have to do a bit of creative cutting as you’ll likely end up with small triangle spaces or shorter stick spaces. Simply take a full (trimmed) lollipop stick, place it into the space and mark with your pencil where you need to make the cuts. This was the most time-consuming part because each space around the edge was different. Also my top tip is to make your cuts and then stick down. Don’t stick your lollipop sticks on to tiny spaces and then have to try and cut the overhang off it won’t create as good-looking a finish.
Step Four – sand the edges
Once all your lollipop sticks are on and dried, take a hand sander (you will want to use an electric sander for this rather than sand paper) and carefully sand around the edges of your project to make sure they are completely smooth and finish at the same edge as your furniture. You want it to ultimately look like it was always there rather than an add-one
Step Five – fill the gaps
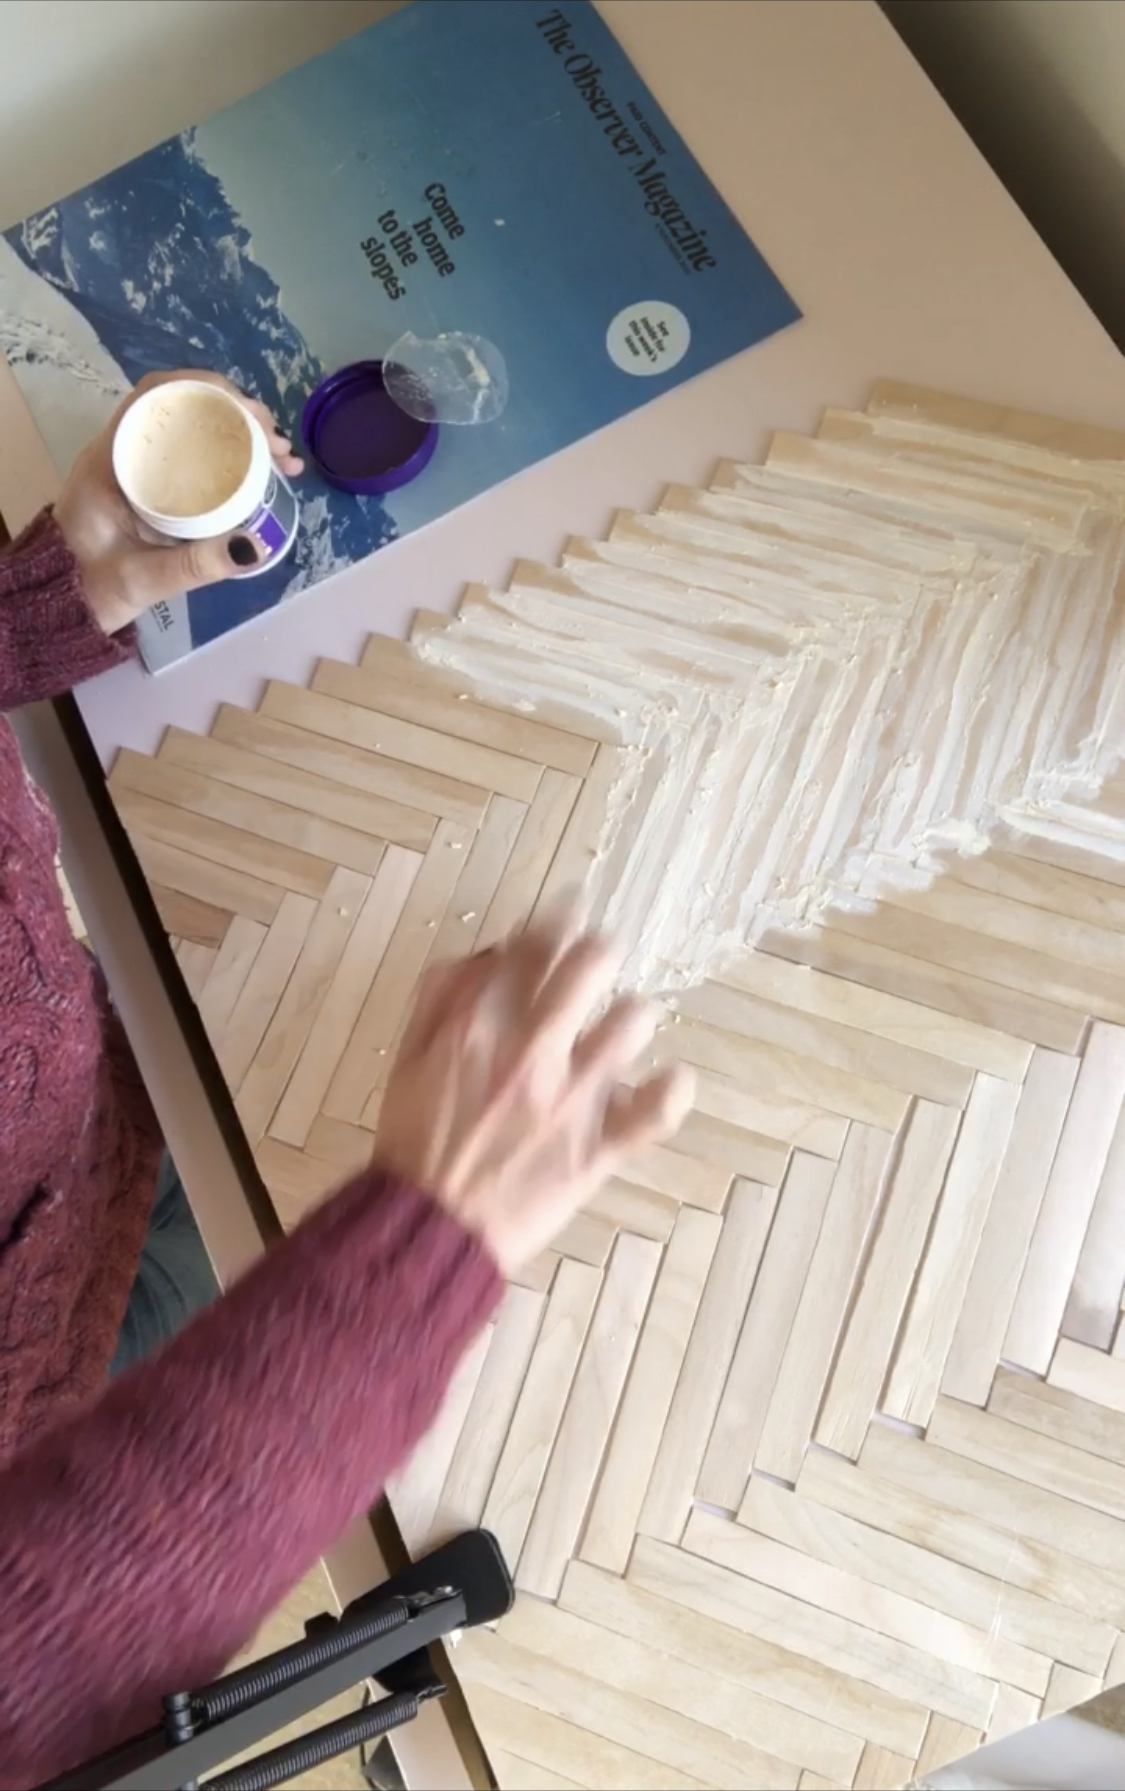
Again, I’ve seen projects where this hasn’t been done and they look super! I just found that filling the gaps creates in itself a really attractive look and helps to stabilise your lollipop sticks. I was able to do my whole top with just a little small tub of this Ronseal wood filler in natural, using my finger as the “smoosher” (I’m all about fingers as tools and also creating new words throughout the process of DIY). I also used the filler along the front and side edges just to really neaten things off.
Step Six – Sand
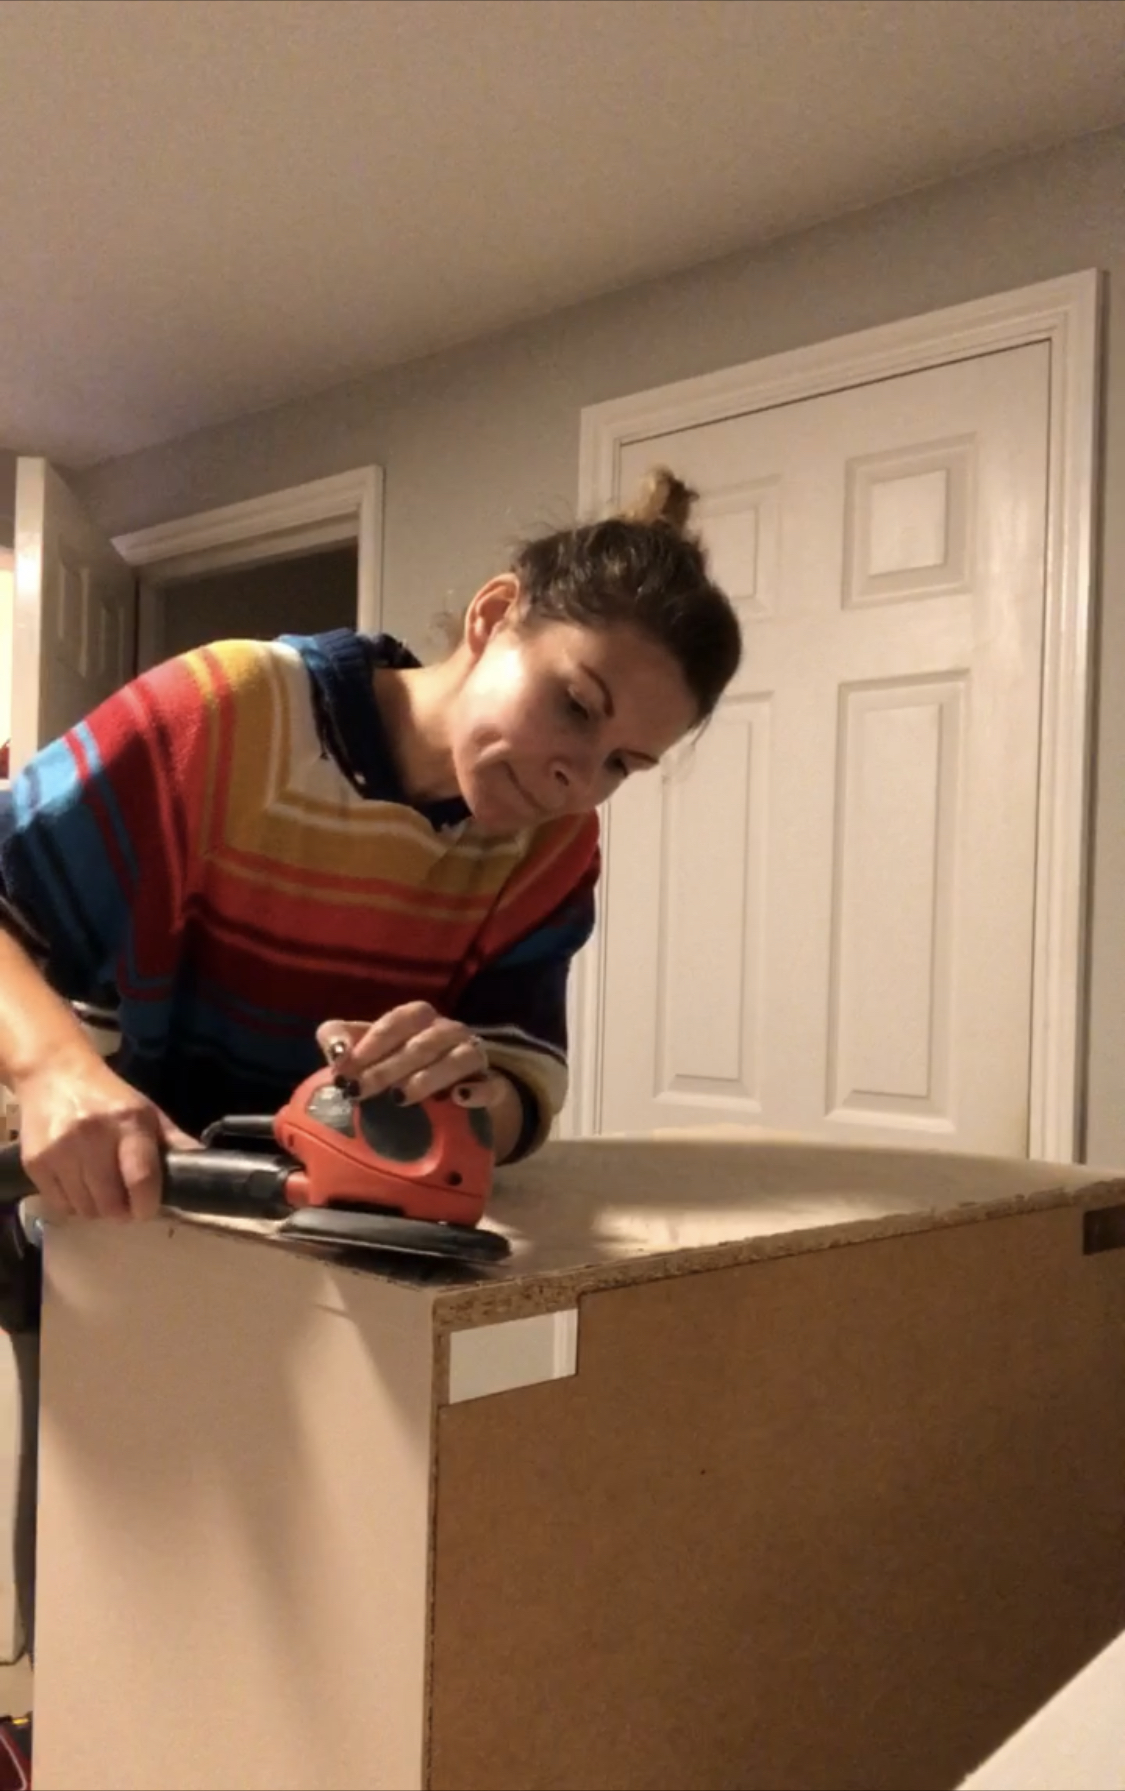
Once the filler is in and dried, you’ll need to sand the top over to make it completely smooth, using a 120 grit paper on your electric sander. This will give your surface such a brilliant finish, and then if you have any small areas of wood filler residue, you can finish these off with some sand paper or a sanding sponge so that you can really direct the area of the sanding.
Step Seven – PVA
PVA is basically like a white glue that dries clear – think about the stuff you used to use for projects in primary school and you’re not far off. For some reason this is the part of the process I was most nervous about for fear of ruining the sticks and it took me a while to get around to it but oh my goodness, it’s like the cherry on the cake.
The PVA has sone so many things – it’s secure the sticks where after 3 or so months they were just starting to rise, it’s given the surface a good sealant coat to better protect it and in doing so, it’s darkened the surface ever so slightly to give it such a lovely glow. I was aiming for a light wood/Scandinavian look, again if you want something darker you’ll need to stain/wax/oil your surface.
And that’s basically it! I realise this sounds like a lot and yes it did take me a while but mainly because I tend to take my time with projects like this but honestly I’m so so happy that I went for it and will be completing a separate project with my leftover sticks so watch this space.
I also did a Reel on Instagram to show you a kind of video version of what I did which you can see here, and the highlights of this entire drawer project are also saved here.
As always don’t hesitate to drop any questions either via comments here on my Instagram account. Happy lollipopping!
Follow me on Facebook | Instagram | Pinterest | Twitter


Wow, what an amazing transformation! I have a TV cabinet that I want to makeover and this has truly inspired me.
Author
Yay Rachel that’s brilliant! Honestly it may sound a bit fiddly but it’s so worth it ☺️
I really appreciate you for publishing this blog here about create a luxe herringbone upcycle with lollipop sticks; it’s really a helpful and very useful for us. This is really appreciated that you have presented this data over here, I love all the information shared. Great article!
Wonderful post! I really appreciate you for effort. It was great idea to up-cycle luxe herringbone with lollipop sticks. Thanks for sharing.
Hi Lins,
This has given me so much inspo – thanks for sharing.
How many lollipop sticks did you use for this project? And what tool did you use for cutting the sticks down?
Thanks in advance
Author
Hi Millie,
I’m so sorry for the late reply, I have been away from my blog for a little while. To cut them down I ended up getting some mitre shears after starting with scissors. There’s no easy way of doing it and it does get a bit laborious after a while. I can’t remember how many sticks I’m afraid, a few were sacrificed for cutting. I’d just order a load and then you can always use it for other projects too, that’s what i’ve been doing with my leftovers
Hiya. What paint did you use for the drawers?
Thank you!
Author
Hi Laura! I just used any leftover paint I had, in this case it was Calamine by Farrow & Ball that I had used for some cupboards.
Hi Millie
How did you ensure that all sticks were cut to the exact same length. This is the part I’ve found difficult. Love your ideas and inspiration
Author
Hi Jill, thank you for your comment! It’s not exact by any means, but that kind of adds to the charm of it 🙂 Good luck!